Getting started
Creating your workspace, verifying your email and signing in.
2plus1finance.com → Get startedCreate your account
- Fill in First name, Last name and Company name. If you are self-employed, just put your own name in the company field — it does not have to be a registered company, and you can change it later in Settings.
- Enter your email address and choose a password. It must be at least 8 characters with at least one capital letter and one number; the tick-list under the box turns green as each rule is met.
- Tick the box confirming you have read the Terms of Use, the Privacy Notice and the offer details, then submit.
- We email you a 5-digit code. Enter it to activate the account. If it does not arrive, check your spam folder, use Resend code, or use Incorrect email? Change it here to correct a typo.
Your free trial and what it costs after
- Every new workspace gets a 14-day free trial. No card is asked for up front, so nothing can be charged automatically when the trial ends.
- After the trial: £6.99 per month, collected by Direct Debit on the web, or through the App Store if you subscribe inside the iOS app.
- Days remaining are shown in a banner on the dashboard, with an Upgrade Now button next to it.
- When a trial or subscription lapses the data stays exactly where it is — the paid screens show a Feature Locked message until you subscribe again.
Signing in
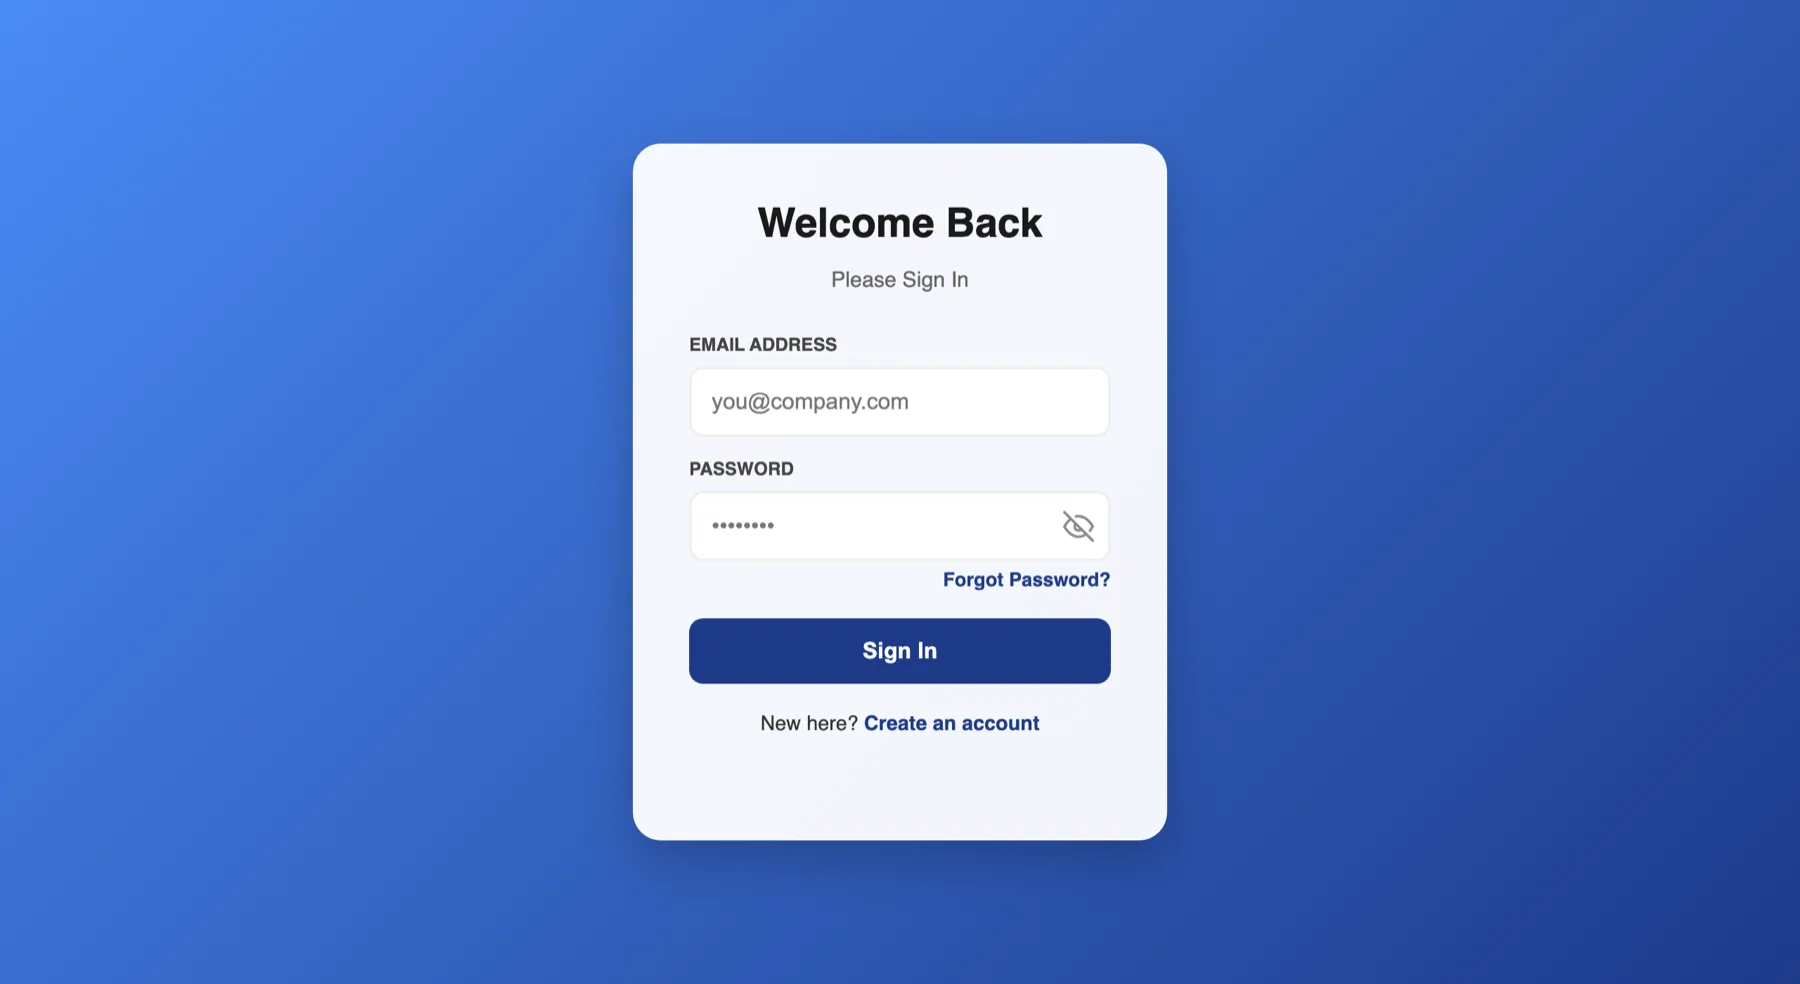
- Enter your email and password. The eye icon reveals the password if you need to check it, and your browser or phone can save it for next time.
- If two-factor authentication is switched on, you are then asked for a 6-digit code — from your authenticator app, or emailed to you, depending on the method you enabled.
- On the phone app you can unlock with Face ID or Touch ID instead of typing your password. You are offered this once after your first successful sign-in on that device.
Forgotten password
Choose Forgot Password?, enter your email, and we send a 5-digit reset code. Enter it, then set a new password (same strength rules as registration). Change Email lets you start again if you typed the wrong address.
Joining someone else's workspace
If a colleague invites you, you receive a link to a Join Workspace page. Your email address is filled in for you and cannot be changed — you only set your name and a password, then verify with the 5-digit code. You land in their company workspace and share its records; you do not need your own subscription.
The dashboard
Your home screen, and the way to every other part of the product.
After sign-in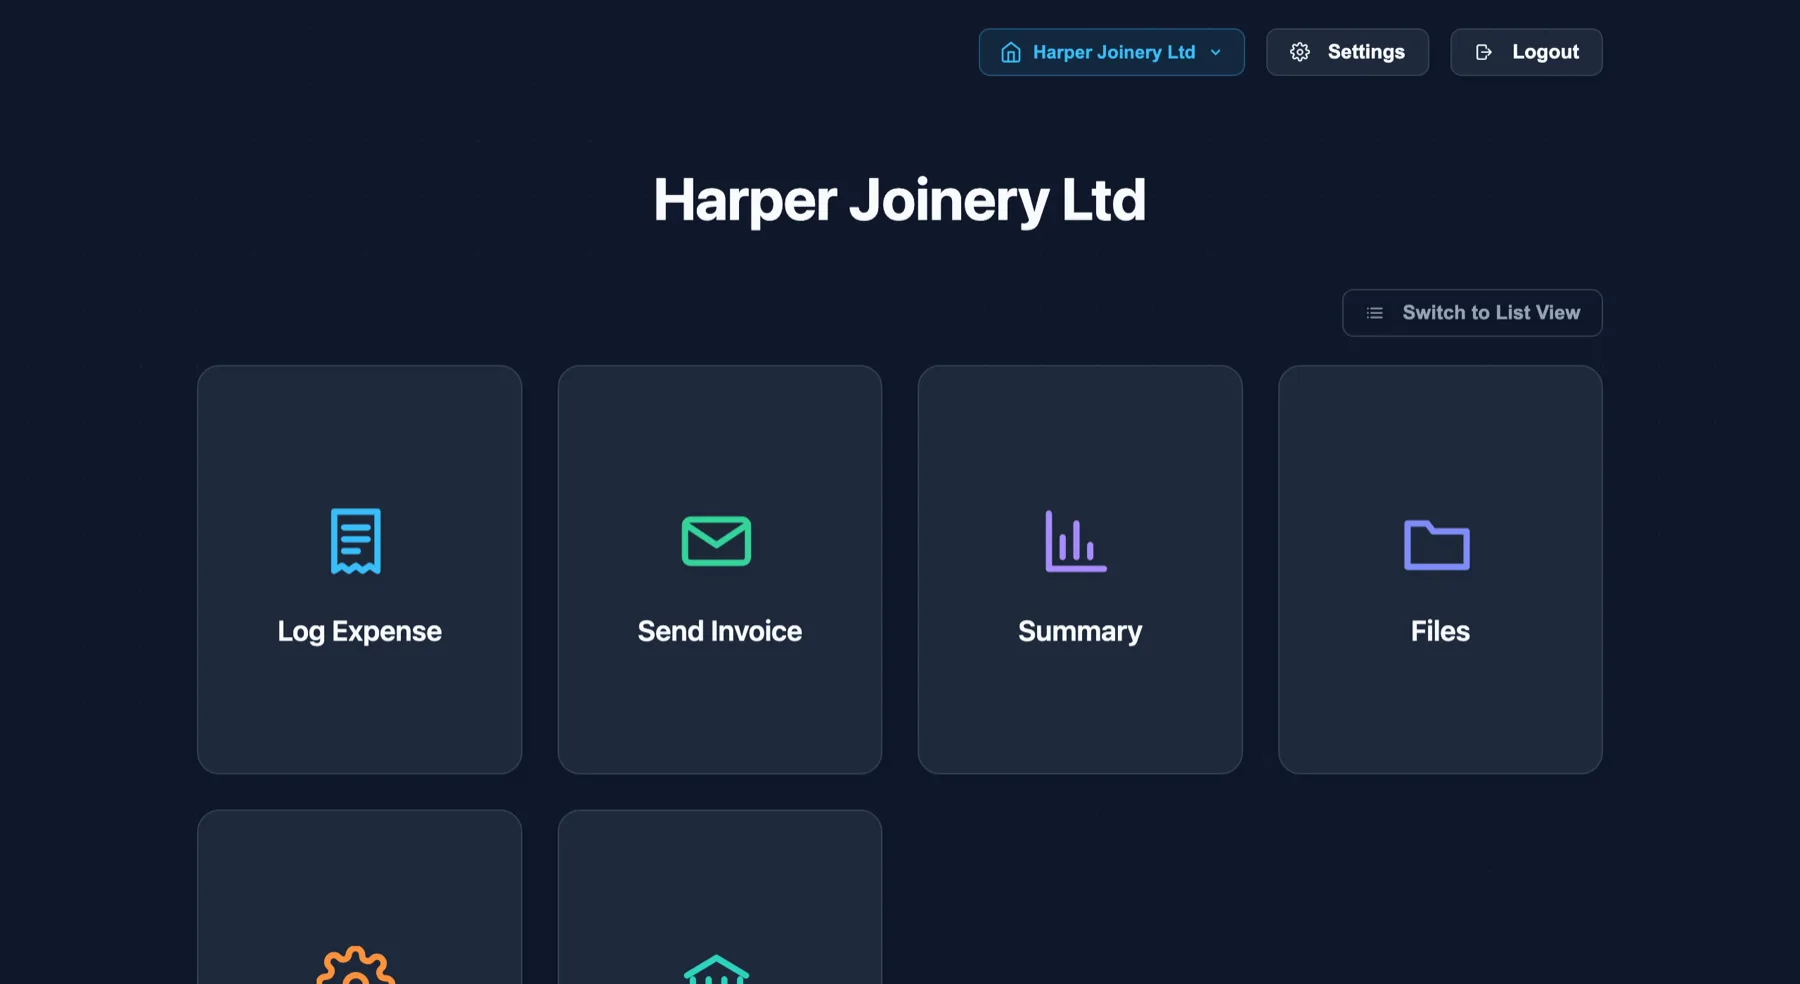
The shortcuts
| Shortcut | What it does |
|---|---|
| Log Expense | Record a purchase from a receipt, or record a mileage trip. |
| Send Invoice | Build an invoice and email it to a client. |
| Summary | All your records, the profit and loss figures, and CSV export. |
| Files | Your document store — folders, uploads, previews. |
| Setup | Clients, saved items, vehicles, invoice branding and advisors. |
| Bank Import Preview | Import a bank statement and reconcile it. Only visible if the feature has been enabled for your workspace. |
Controls on this screen
- Switch to List View / Grid View — swaps the shortcut tiles between a grid of cards and a compact list. Your choice is remembered.
- Trial banner — days left, with a direct upgrade button.
- The business menu — the button carrying the company name, if you keep books for more than one business or work on a client's.
- Settings and Logout.
More than one set of books
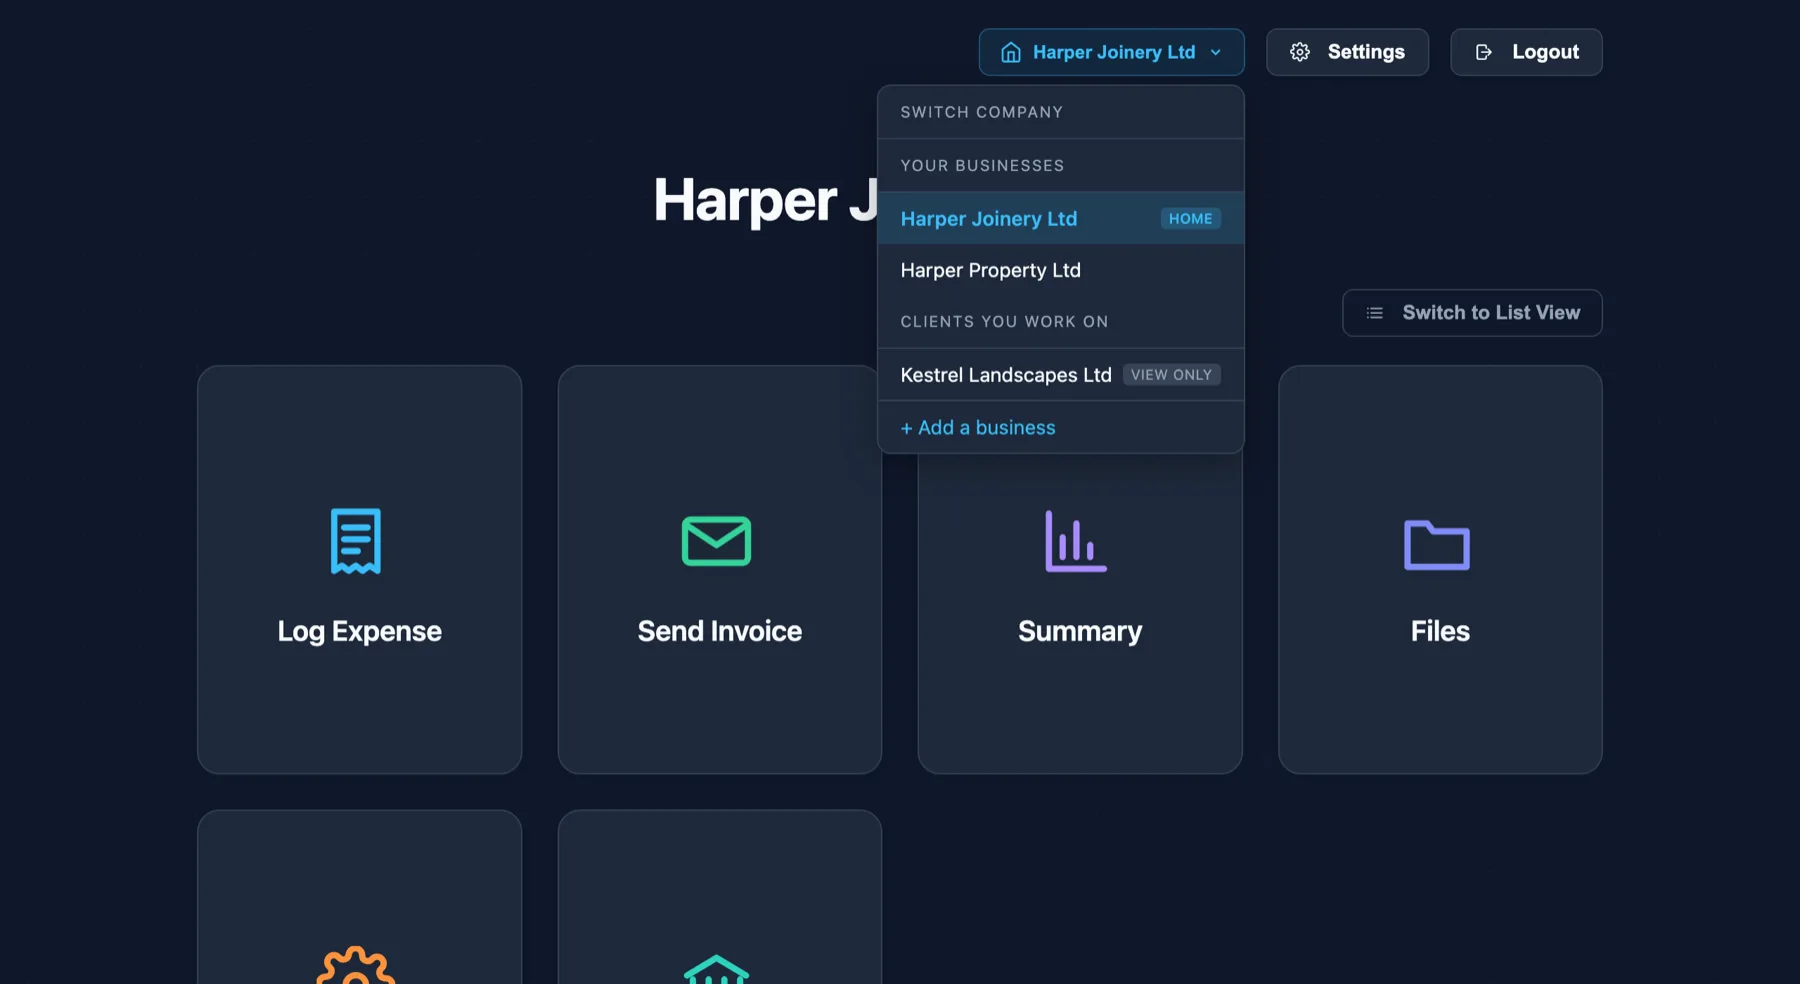
- Your businesses — the ones you own. The first is marked HOME. Switch into any of them at any time; each keeps entirely separate records, invoices, bank details and tax figures.
- Clients you work on — books someone else has given you access to, each marked CAN EDIT or VIEW ONLY. See Working on someone else's books.
- While you are inside a client's books the header carries a CLIENT marker, so it is never a guess whose records are on screen.
- + Add a business creates another one. It deliberately does not switch you into it — being moved somewhere new without asking is how a receipt ends up filed against the wrong company.
Logging an expense
Capture a receipt, let the scanner read it, and check the numbers before saving.
Dashboard → Log Expense → Log Expense tab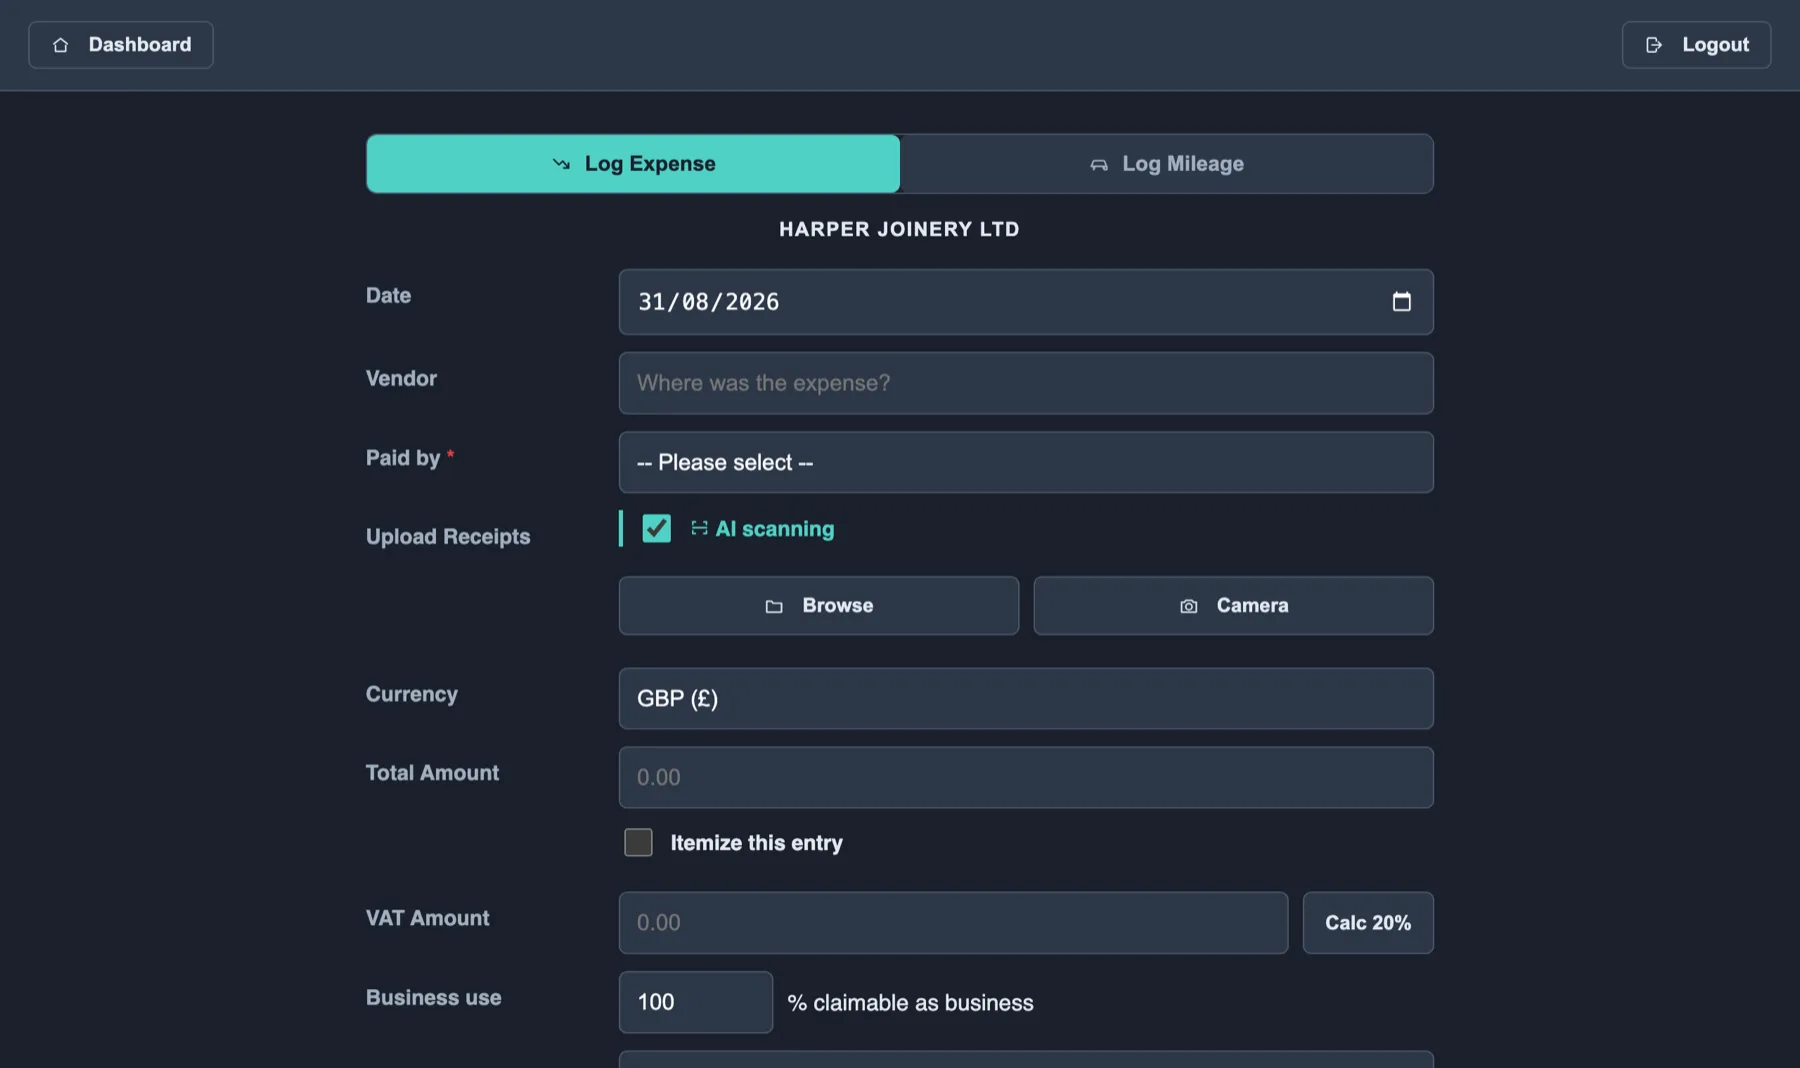
The quickest route
- Attach the receipt first. Use Browse to pick a file, Camera to photograph it, or drag the file anywhere onto the page — the whole window becomes a drop target and scanning starts on release.
- Leave AI scanning switched on. The receipt is read and the vendor, date, total, VAT, how it was paid and any line items are filled in for you.
- Check what it filled in, add anything it could not know, and press Save Record.
Every field
| Field | What to put in it |
|---|---|
| Date | The date on the receipt. Filled from the scan when it can be read. |
| Vendor | Where the money was spent. Suppliers you have used before are suggested as you type. |
| Paid by | Card, Cash, Bank transfer or Other. |
| Upload Receipts | Images or PDFs. You can attach more than one to a single expense. |
| Currency | GBP, USD or EUR. |
| Total Amount | The full amount paid. Scanning several receipts into one expense adds their totals together. |
| Itemize this entry | Opens the itemised breakdown so you can list individual lines. The scan fills these in when the receipt lists them. |
| VAT Amount | Enter it, or press Calc 20% to work it out from the total. |
| Business use | The percentage that is business spend — see below. |
| Notes | Anything you will want to remember at year end. |
It remembers what you do with a supplier
Once you have logged an expense for a supplier, the next one for the same supplier arrives with Paid by and Business use already filled in from last time — a phone bill that was 80% business in June is still 80% business in July, and the direct debit that paid it is still a direct debit.
- Both suggestions say on screen where they came from, for example "Paid by set to Bank transfer because that is how the last Vodafone expense was paid. Change it if this one differs."
- Anything you choose yourself wins over the receipt, and the receipt wins over history. History only ever fills a gap.
- Nothing is suggested while you are editing an expense that already exists.
Part-business, part-personal spending
Set Business use to the percentage you can claim. The record keeps the full amount you actually paid, so it still matches the transaction on your bank statement, and the non-business slice is stored alongside it as the disallowable amount. Your allowable figure is the total minus that slice, which is how HMRC expects it to be presented. Both figures appear as their own columns in the CSV export.
More than one receipt
Attach a second receipt while an expense is open and you are asked whether to Save & Create New Expense or Add to This Expense. Use "add" for a single purchase split across several slips; use "save and new" for genuinely separate purchases.
Logging mileage
Record a business journey and claim it at the right rate.
Dashboard → Log Expense → Log Mileage tab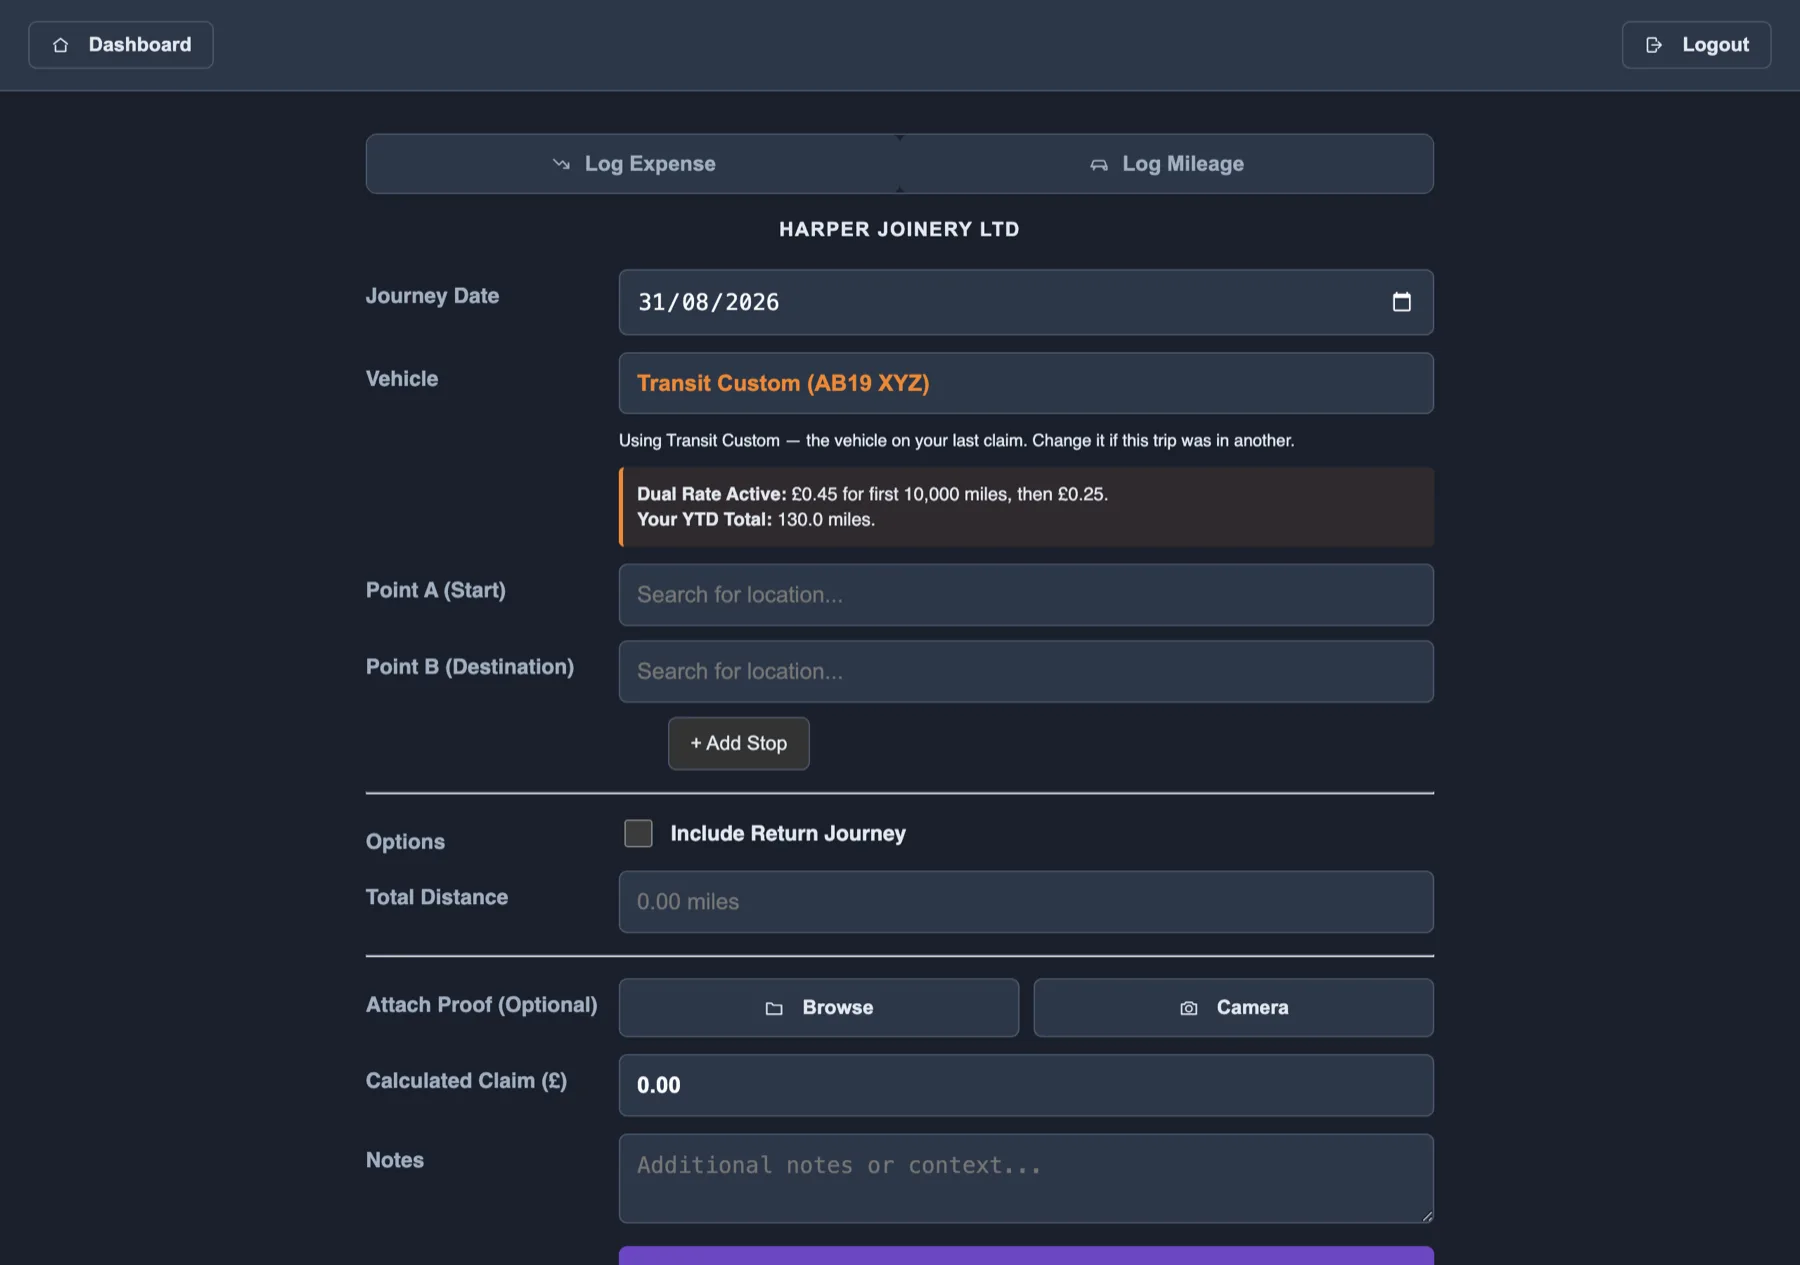
- Check the Journey Date.
- Pick the Vehicle. The one from your last claim is selected automatically and the form says so; choose Custom / Unregistered for a one-off. The panel underneath shows the rate that applies and your mileage so far this tax year.
- Enter Point A (Start) and Point B (Destination). Use + Add Stop for multi-drop trips — each leg is added to the total.
- The map plots the route and fills in Total Distance. Satellite switches the map view. With no signal the map is unavailable and you type the distance in yourself.
- Tick Include Return Journey to double the distance for a round trip.
- Optionally Attach Proof — a parking ticket or a job sheet.
- Check the Calculated Claim, add notes, and save.
Which rate is used
- Your own vehicle — the mileage allowance (pence per mile) from the vehicle's setup. If you configured a secondary rate, journeys past the annual threshold switch to it automatically, and the form shows both rates and your year-to-date total.
- A company car — marked as such in Setup, so you claim the HMRC advisory fuel rate (fuel only) instead of the mileage allowance. You cannot claim both. Where a vehicle has two advisory rates configured (home and public charging, for instance), you choose which applies on each trip.
Creating and sending invoices
Build an invoice, preview it, email it to the client, and keep track of what has been paid.
Dashboard → Send Invoice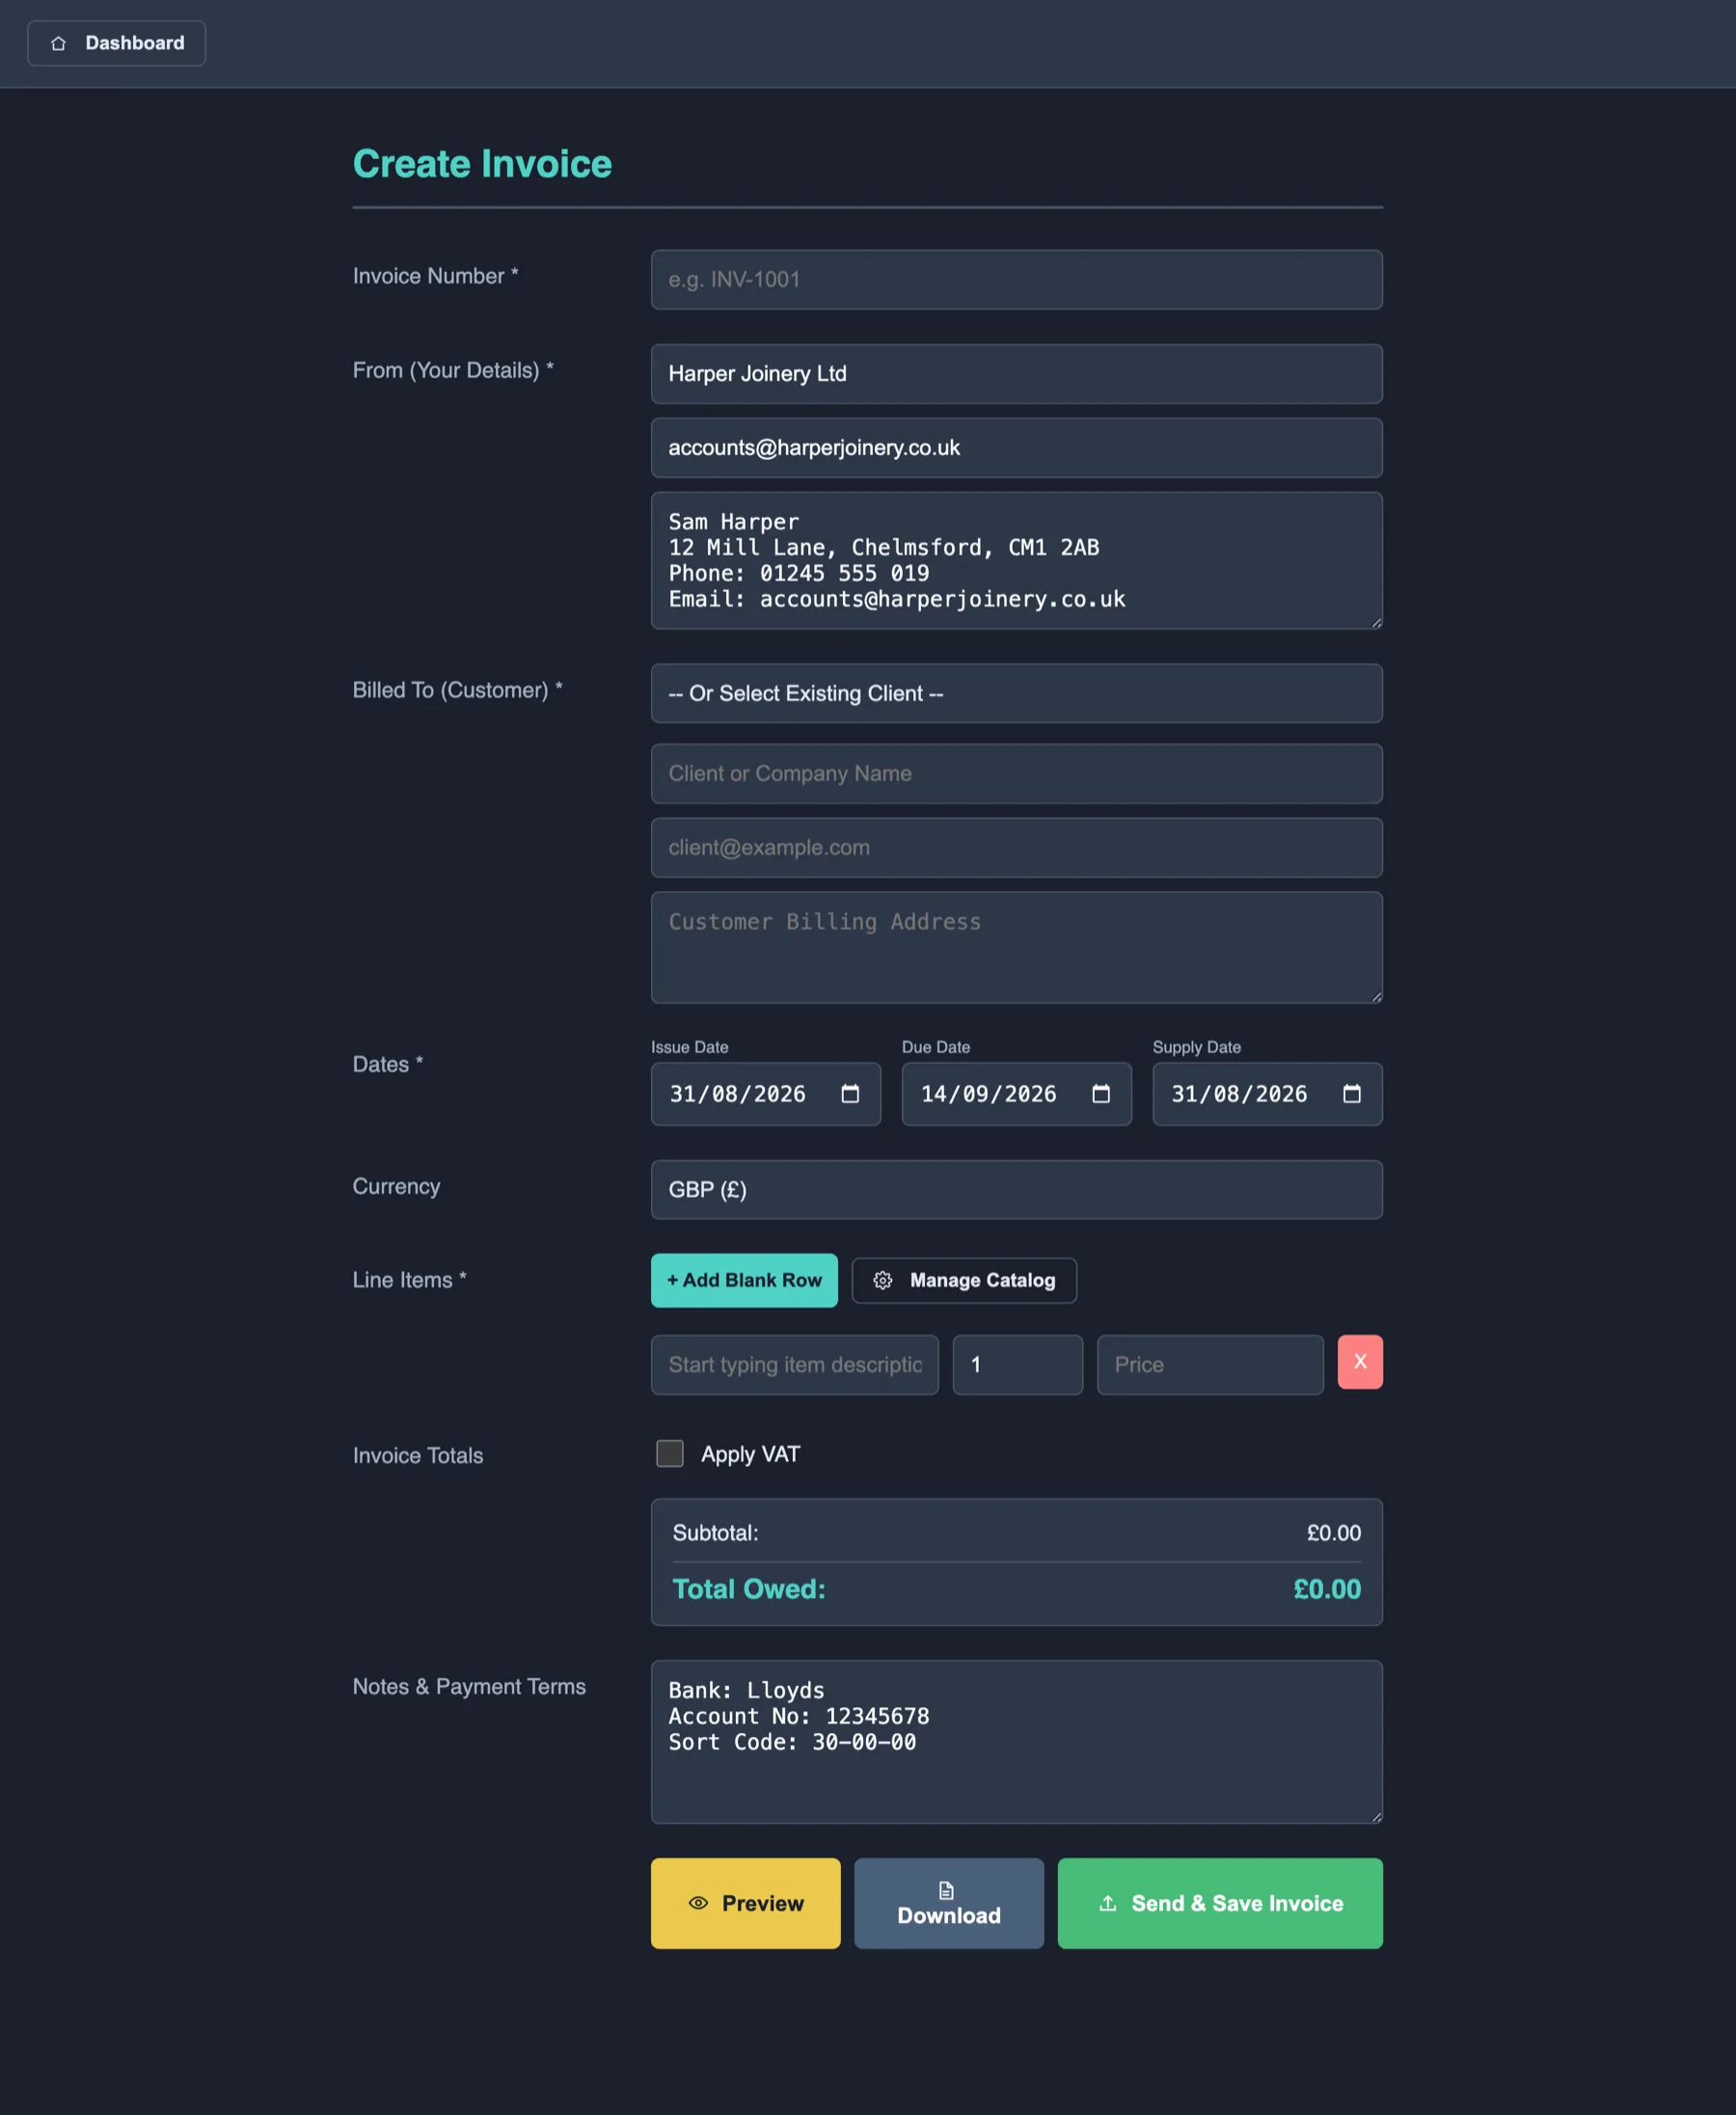
- Invoice Number — your own reference, such as
INV-1001. - From (Your Details) — filled in from Setup → Invoices. Change it there rather than on every invoice.
- Billed To — type the customer's name and address, or pick one from Or Select Existing Client.
- Dates — issue date, due date and, where it differs, the supply date.
- Line Items — + Add Blank Row types a line from scratch; Manage Catalog pulls in a saved item with its price already set.
- Invoice Totals — tick Apply VAT and set the rate (20% by default). Subtotal, VAT and total owed update as you type.
- Notes & Payment Terms — your bank details from Setup are appended automatically; use this box for anything specific to this invoice.
- Preview shows the finished document, Download saves a PDF, and Send & Save Invoice emails it to the client and files it in your records.
After it has gone out
- Sent invoices appear under Summary → Income, alongside any other money coming in. The Invoices chip narrows the list to them.
- Open one and use Mark Status to flip it between Outstanding Payment and Payment Received. Received invoices count as income in the profit and loss figures.
- Resend sends the same invoice again — to the original address, or to a different one if it needs to go to an accounts department.
Setup: clients, items, vehicles and branding
The reference data the rest of the product draws on. Fill this in once and the other screens get faster.
Dashboard → Setup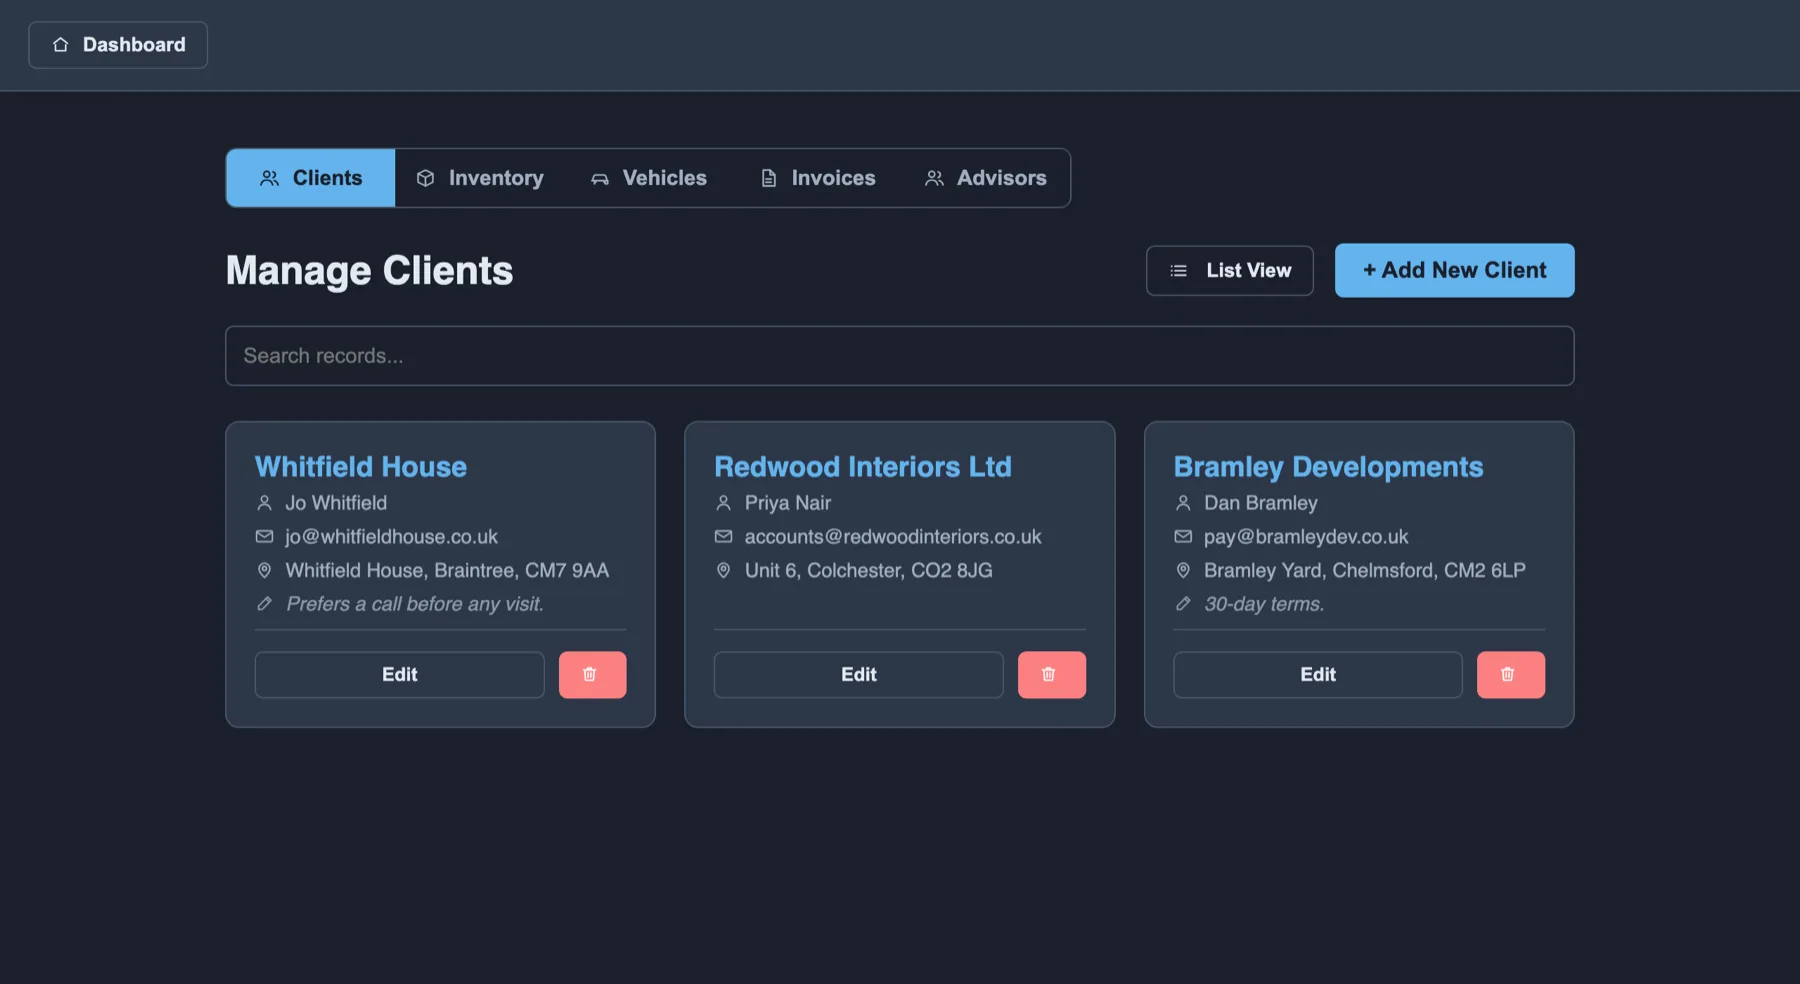
Clients
Add a client with a primary contact name, company name, email address, billing address and any internal notes. Saved clients appear in the invoice builder's picker, so their details are filled in with one selection. Use the search box and the list/grid toggle to find one in a long list.
Inventory
Products or services you invoice for regularly. Each item stores a name or description, a selling price, optionally your cost, and an image. Items become the catalog you pull from when adding invoice lines.
Vehicles
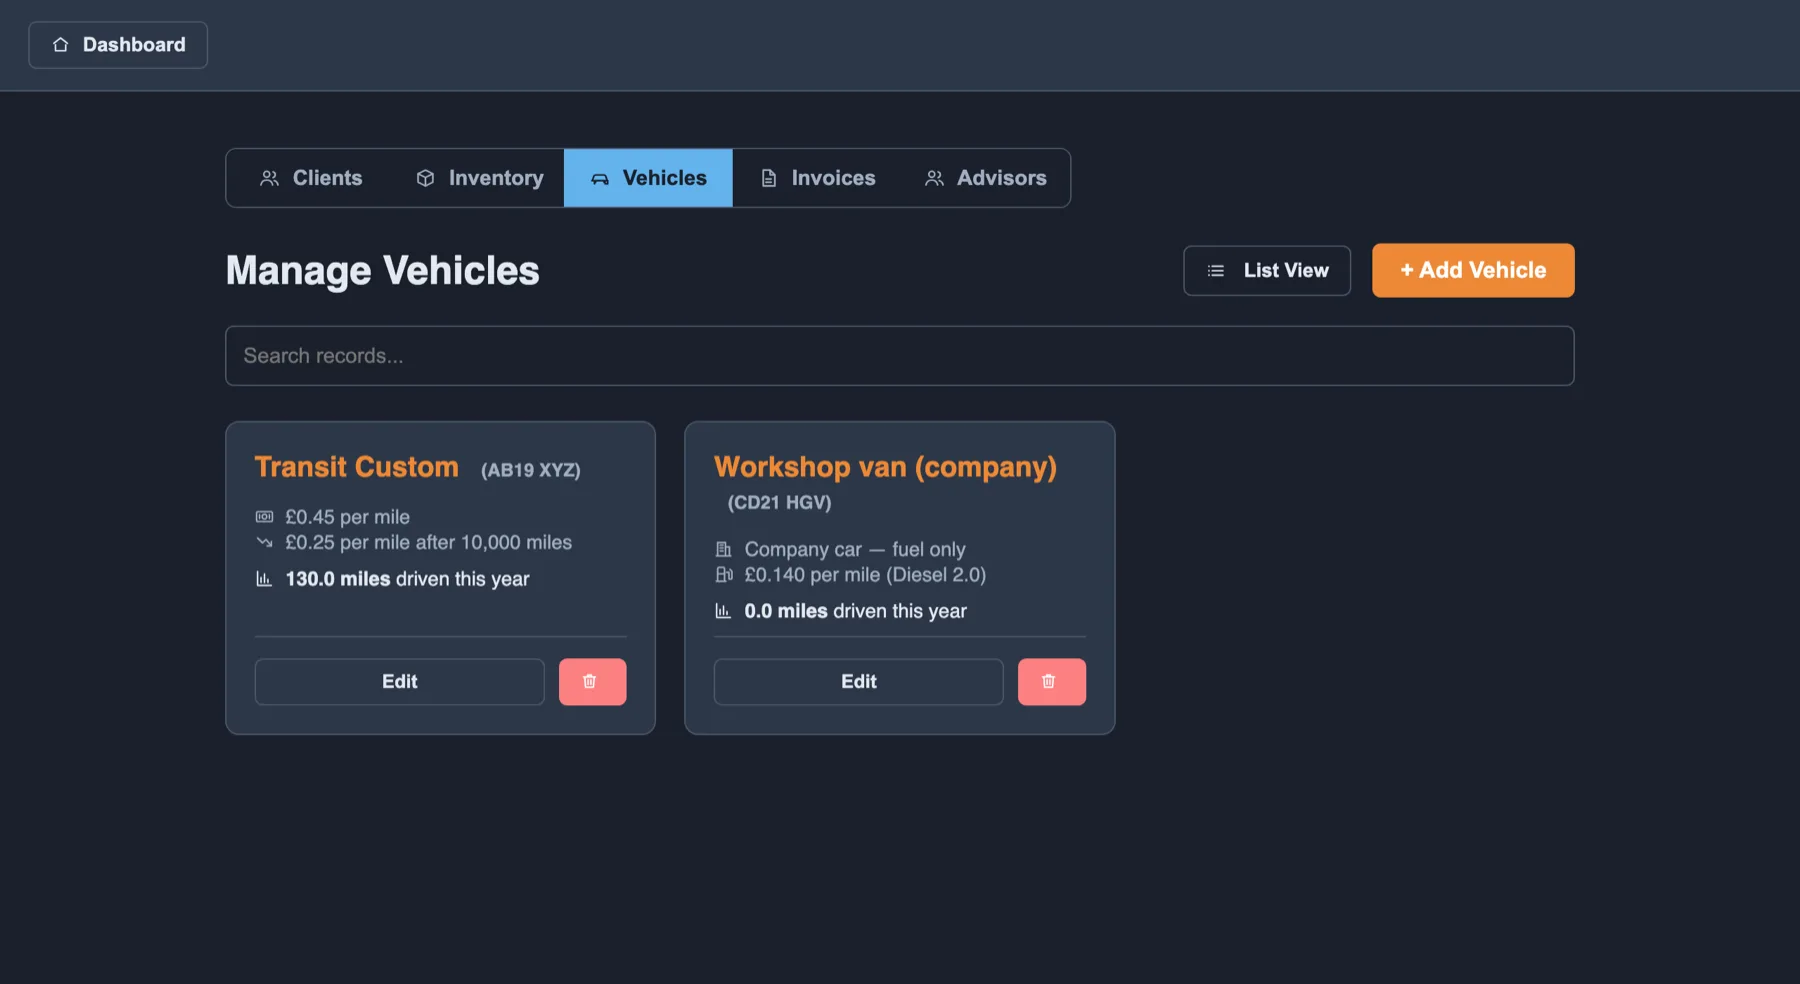
| Setting | What it controls |
|---|---|
| Vehicle name / Registration | How the vehicle appears when you log a trip. |
| Company car | Tick for a company-owned car. You then claim the HMRC advisory fuel rate (fuel only) rather than the per-mile allowance. |
| Vehicle type | Car/van, motorcycle or bicycle — each has its own allowance. |
| Mileage allowance rate | Pence per mile for your own vehicle. Use current HMRC allowance fills in the published rate. |
| Secondary rate + threshold | The lower rate that applies once you pass the annual mileage threshold (10,000 miles by default). The switch happens by itself. |
| Fuel type / engine size | Used to look up the correct advisory fuel rate. |
| Advisory fuel rate 1 and 2 | The fuel-only rates for a company car. Add a second, labelled rate where you need one (home vs public charging, for example), and choose between them per trip. |
| Tax year reset date | When cumulative mileage resets. Defaults to 6 April, the UK tax year. |
Invoices (branding and payment details)
- Company logo and an optional A4 background template — both appear on every invoice you generate.
- Company name, reply-to email, phone and address — the "From" block on your invoices. The reply-to address is where a client's reply goes.
- Payment information — bank name, account number and sort code, appended to the bottom of every invoice.
- Each business you own keeps its own branding and bank details, so switching business changes what appears on the invoice.
Summary and reports
Everything you have recorded, in one place, with the figures your accountant asks for.
Dashboard → Summary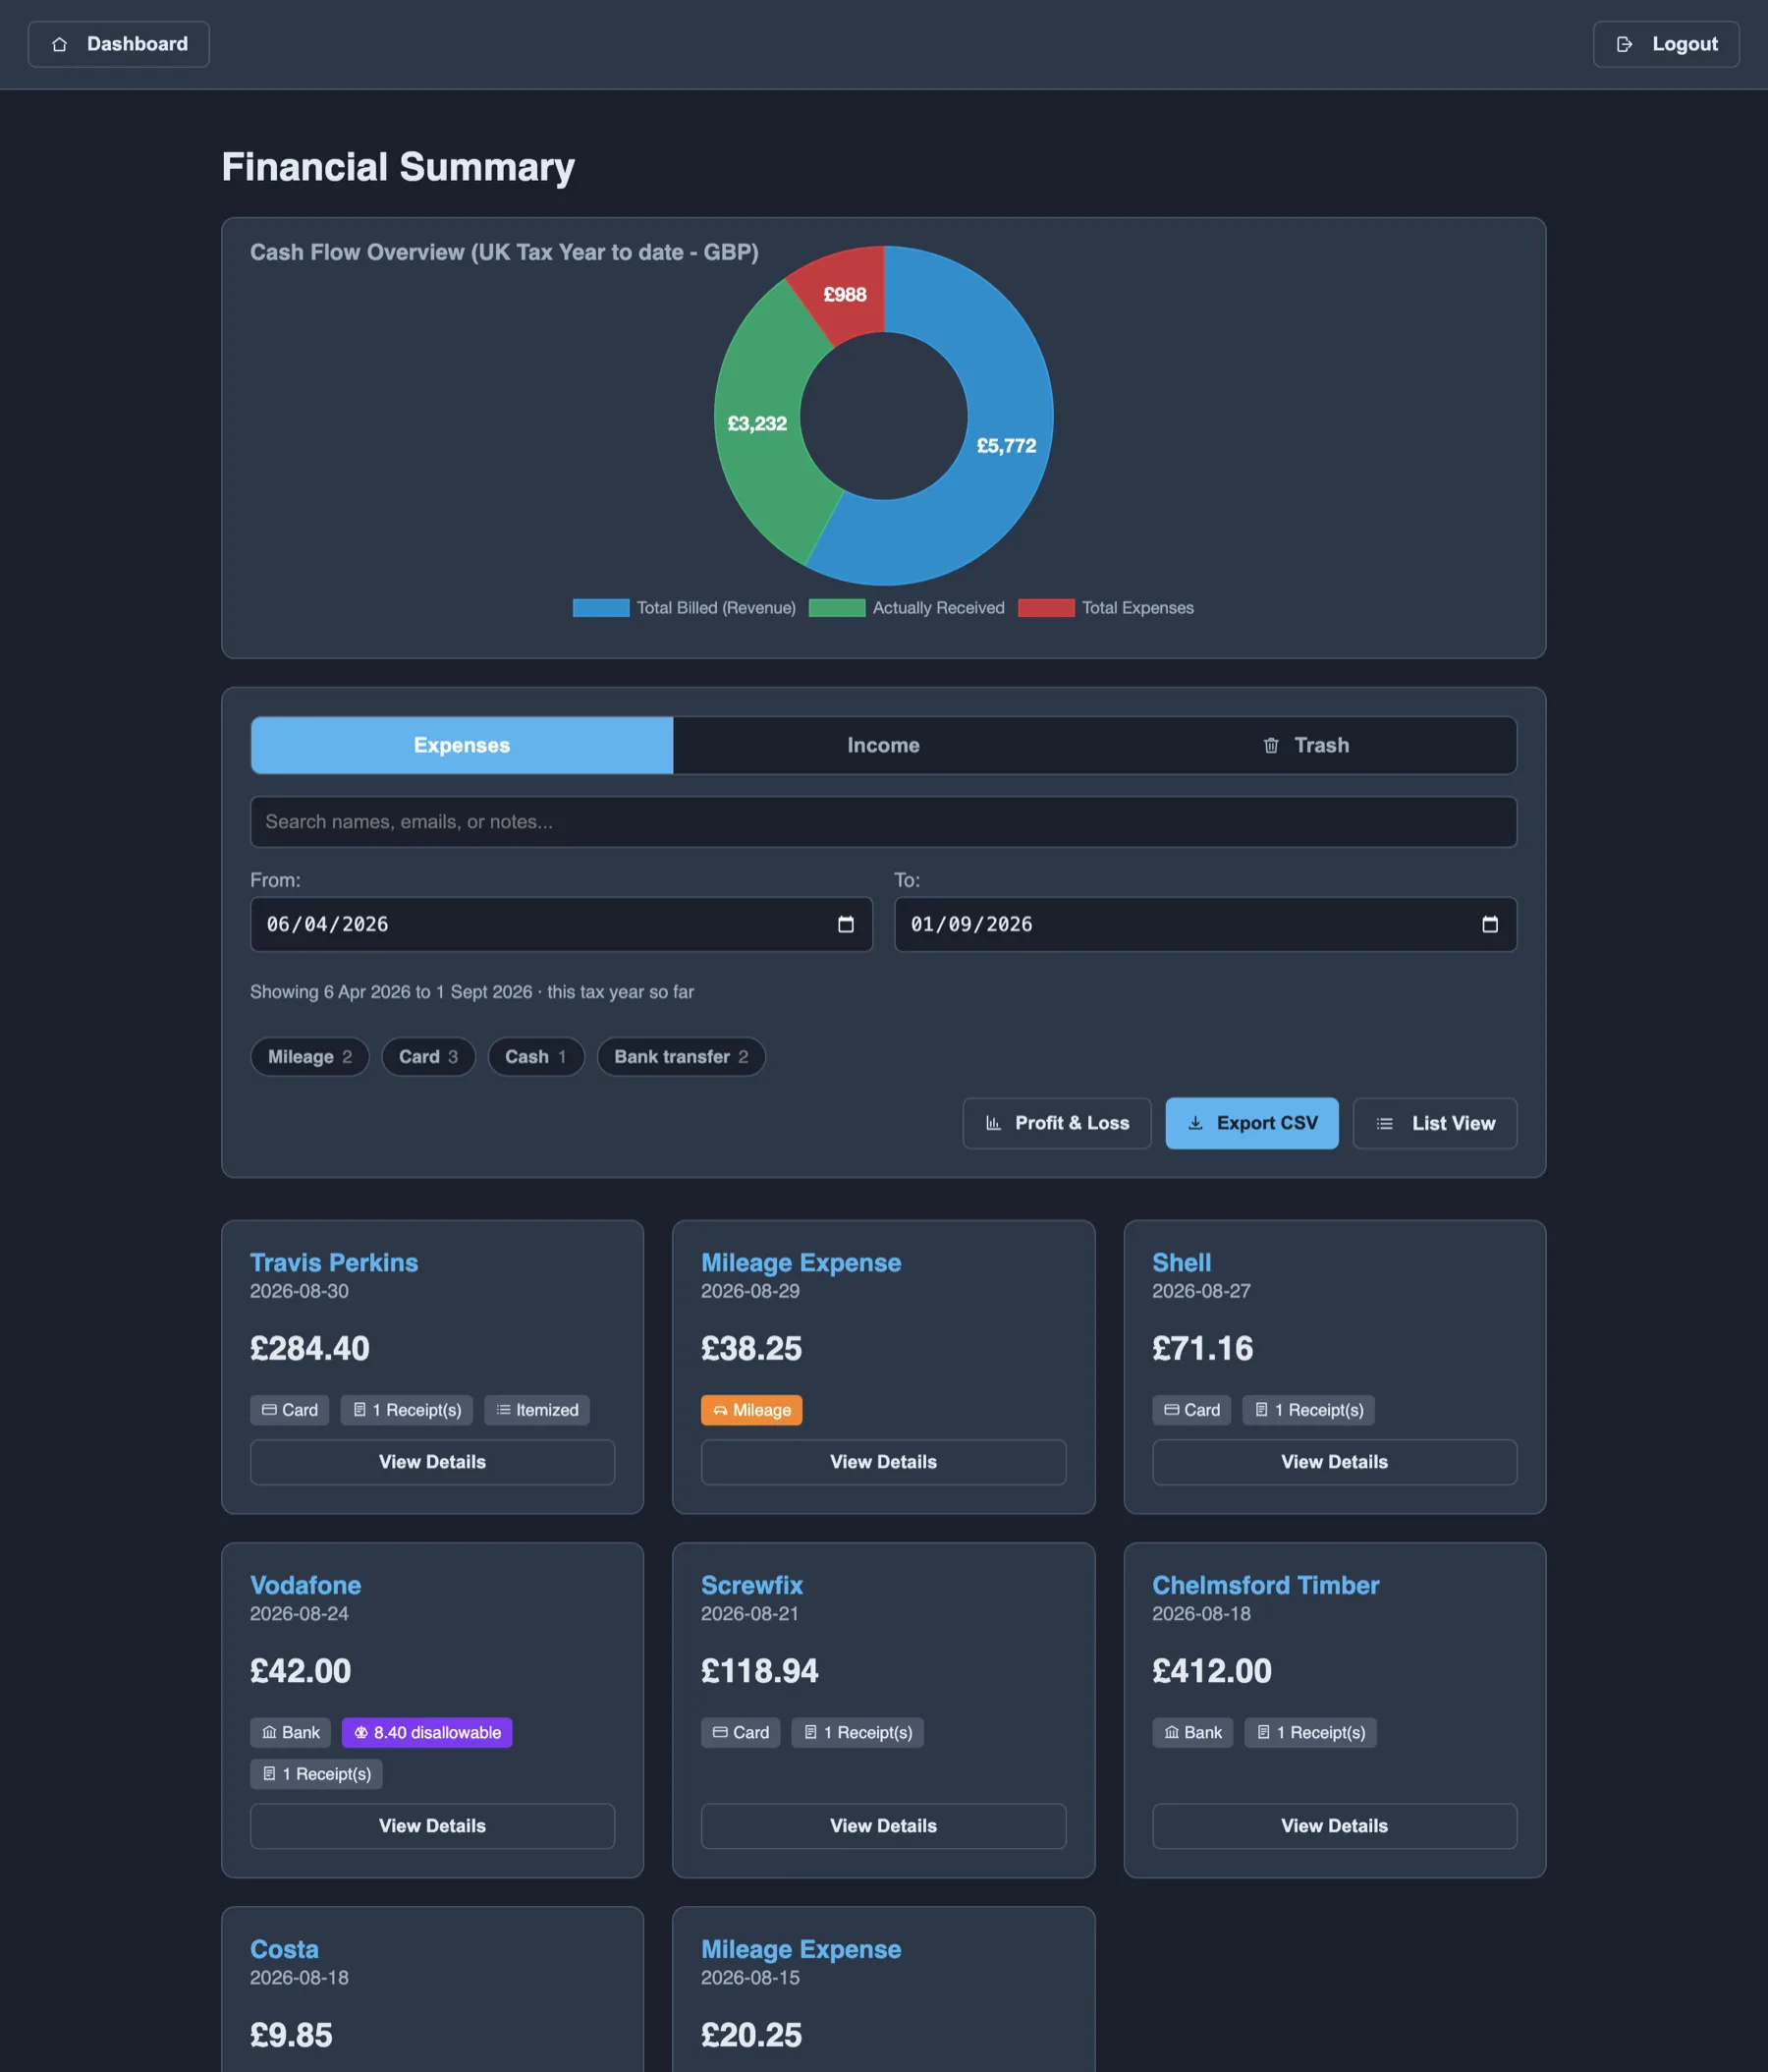
Finding a record
- Cash Flow Overview compares total billed, what has actually been received, and total expenses.
- Set the From and To dates — the page opens on the current UK tax year to date, and every figure and list respects the range you choose.
- Switch between the Expenses, Income and Trash tabs.
- On the Expenses tab, the chips under the dates filter by how something was paid — Mileage, Card, Cash, Bank transfer. Only the ones with records behind them are shown.
- Search by name, email or note text, and toggle between list and card views.
Opening a record
Click any record to open it. The detail panel shows the date and who created it, the total, the itemised breakdown, mileage details for a trip, and the attached receipts — use the arrows to page through several attachments, and the zoom and rotate controls to read a photographed receipt. Edit makes the fields writable; Save commits the change. Invoices additionally offer Download PDF, Resend Invoice and Mark Status.
Income
Everything coming in, in one list — the invoices you have sent and any other income — sorted newest first.
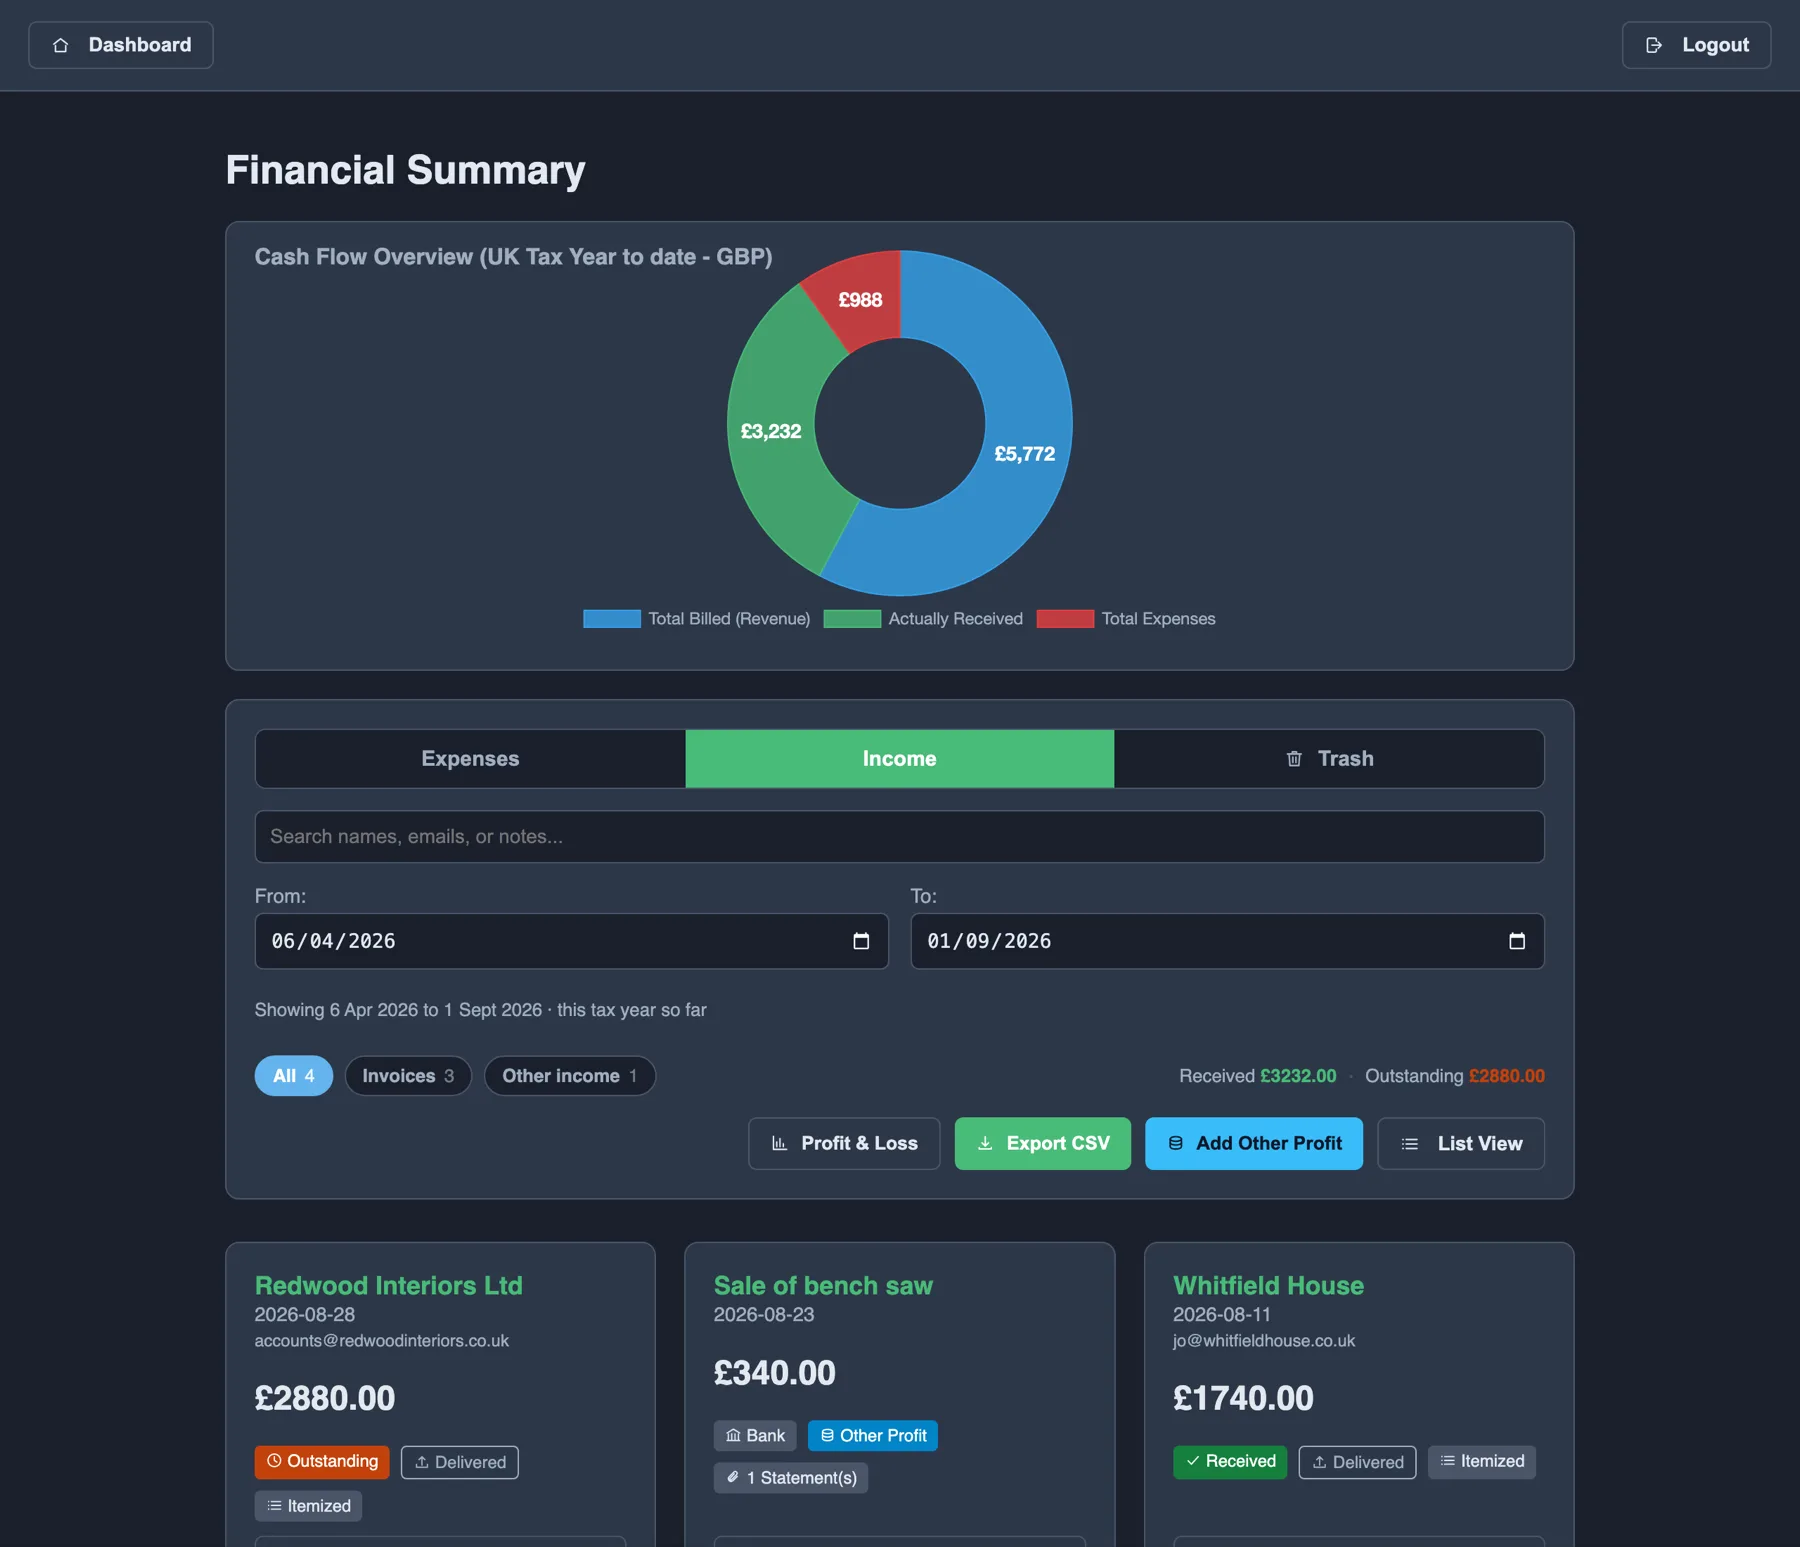
- The chips filter the list to All, Invoices or Other income, and each carries its own count.
- Rows keep what makes them different: an invoice keeps its Outstanding or Received badge, its Resend and its PDF; other income opens its own editor.
Other income
Money that did not come from one of your invoices — bank interest, an asset sale, a grant. Add Other Profit records the date, source, amount, currency, how it was received and any VAT, and lets you attach the statement it came from. Scan Statement reads a PDF or photo and fills the fields in for you, the same way receipt scanning does.
Profit & Loss and export
- Profit & Loss opens the summary of income against expenditure for the selected dates; change the dates in the panel and it recalculates immediately.
- Export CSV downloads the records in the current range — the file to hand to an accountant or load into a spreadsheet. Expenses include separate Allowable and Disallowable columns for part-personal spending. On the Income tab it asks which kind you want, because an invoice has a customer, a due date and a status while other income has a source, and one file cannot carry both sets of columns.
Trash and restoring
Files
A document store for anything that is not a receipt or an invoice — contracts, certificates, correspondence.
Dashboard → Files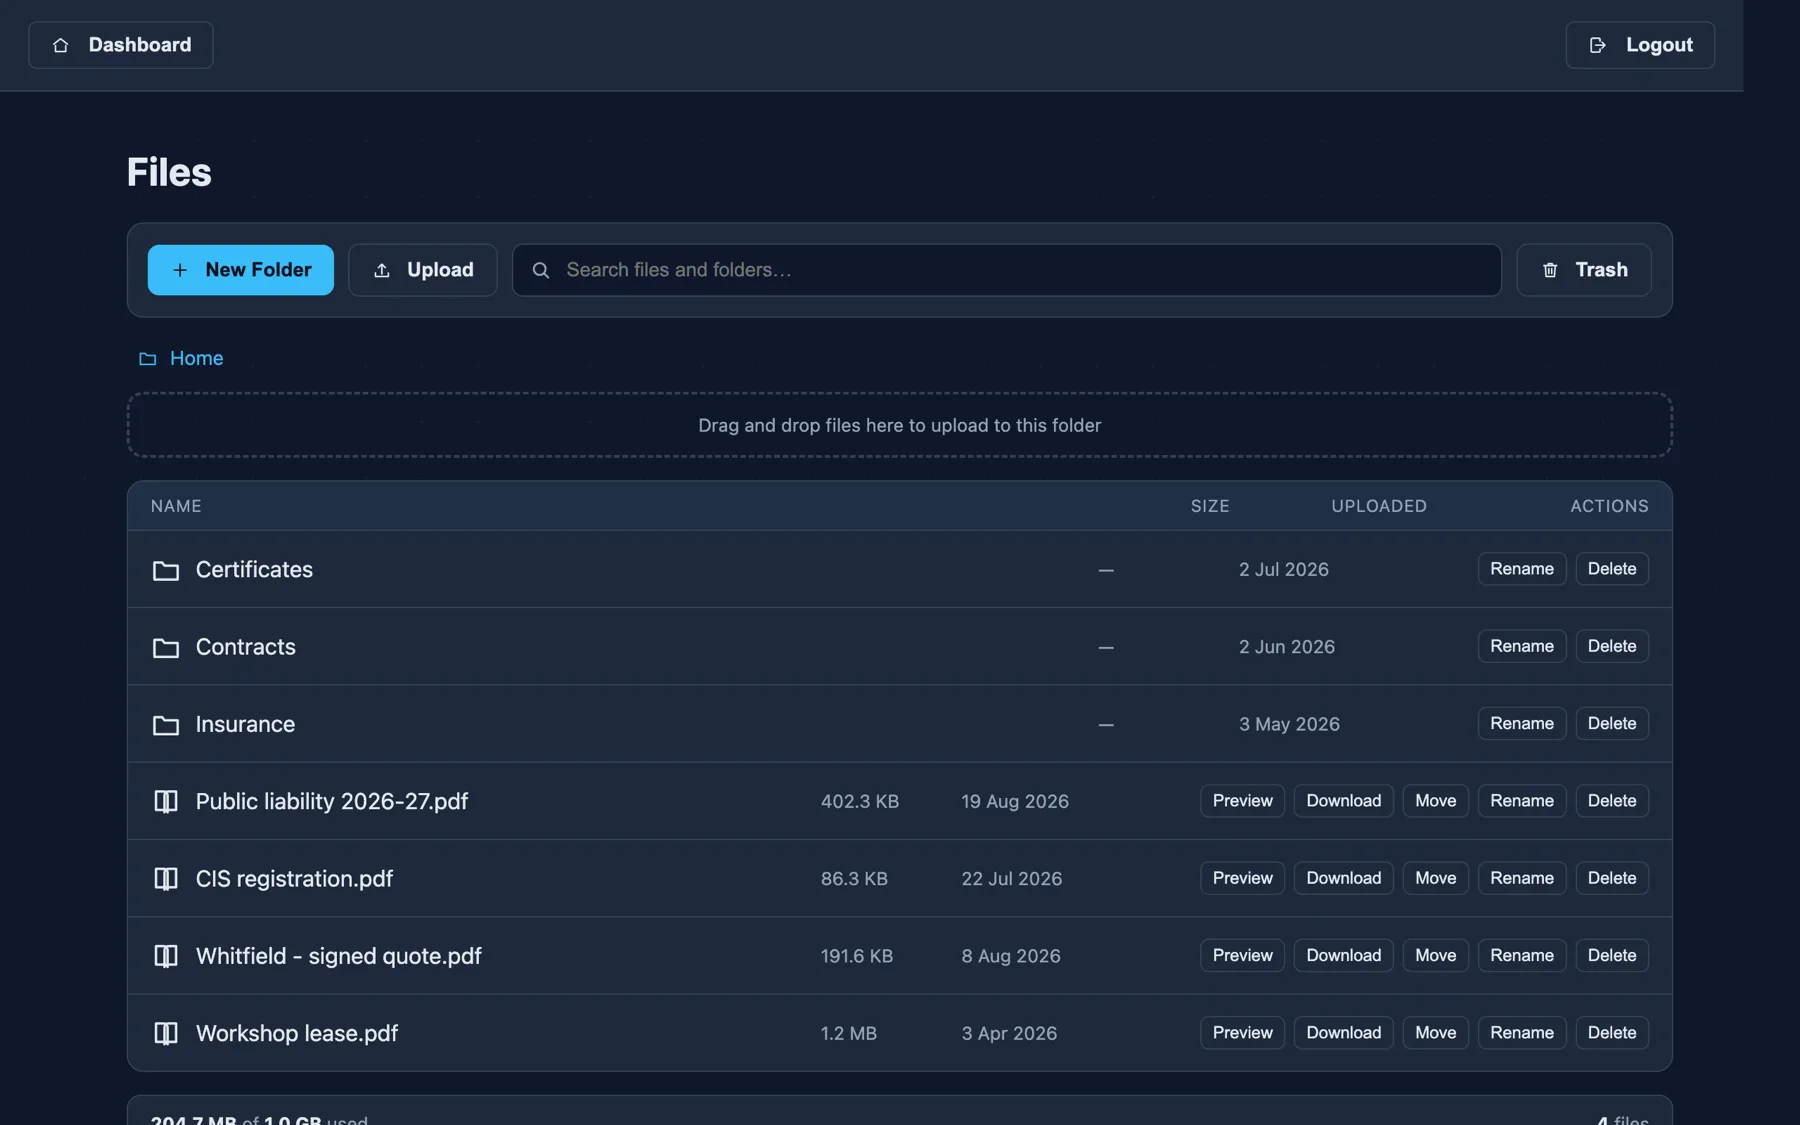
- New Folder creates a folder; open it and upload into it. Folders can be renamed.
- Upload picks files, or drag them straight onto the file list to upload into the folder you are looking at. The limit is 50 MB per file.
- Preview opens images and PDFs in the built-in viewer, with zoom in, zoom out, reset to 100%, rotate left and right for a photograph taken sideways, and paging between files. Open in browser hands the file to your browser's own viewer instead.
- Rename changes the name only — the extension is always preserved, so a PDF cannot accidentally become something the computer can no longer open.
- Move asks which folder to move the file to.
- Search looks across files and folders by name.
Storage and trash
- A workspace starts with 1 GB. The bar turns amber past 80% and red past 95%.
- Deleted files go to Trash and are removed permanently after 30 days. They still count against your storage until then — if uploads start failing, emptying the trash is the first thing to try.
- Empty Trash deletes everything in it immediately and cannot be undone.
Bank Import Preview
Import a bank or credit-card statement and tie each transaction to the record it belongs to.
Dashboard → Bank Import (only if enabled for your workspace)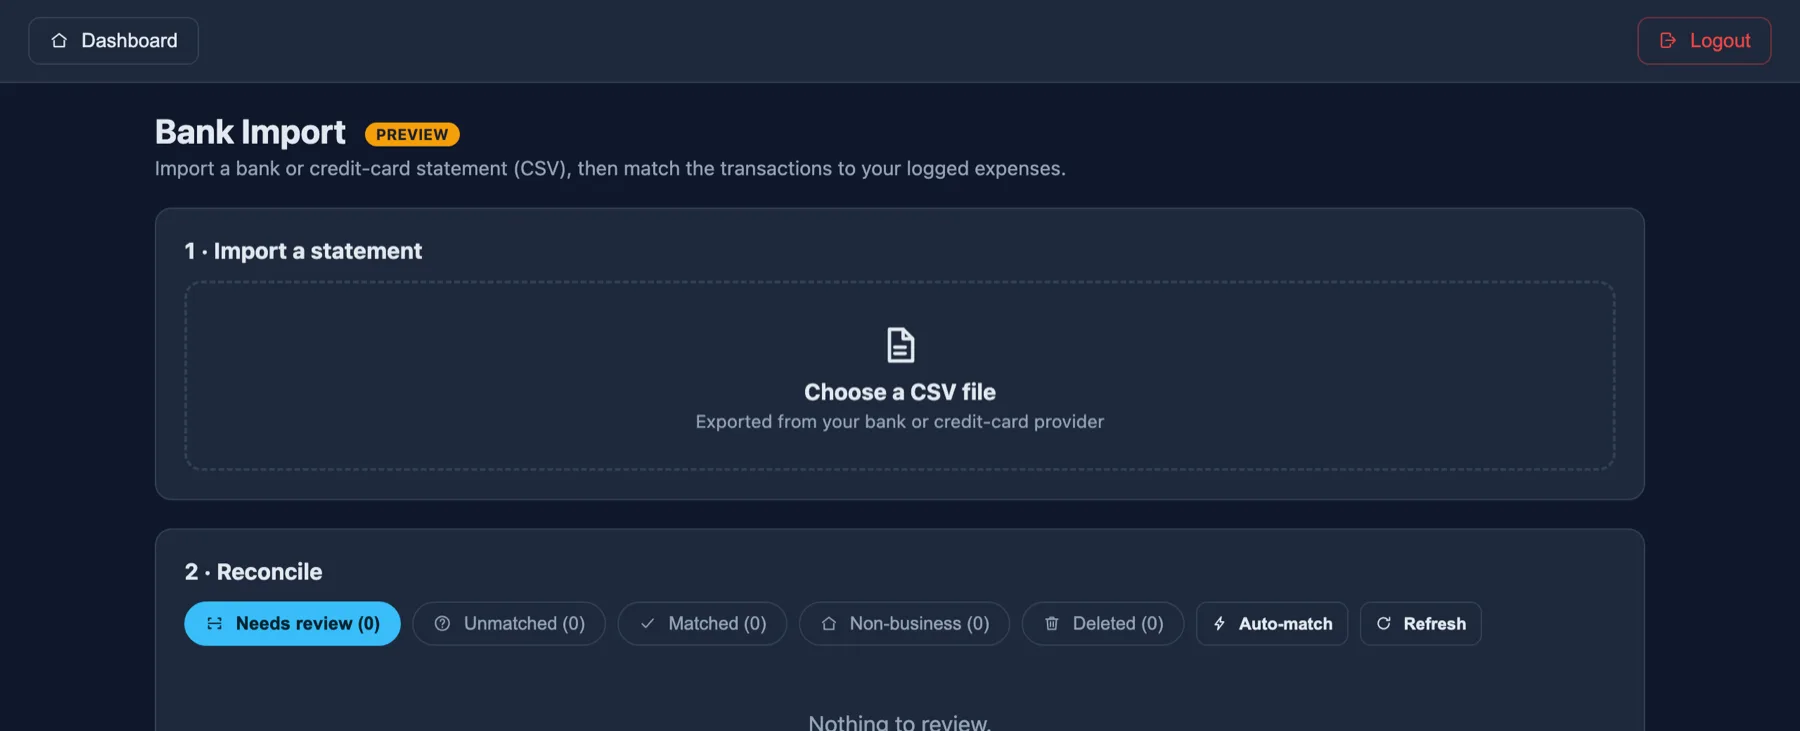
Step 1 — import a statement
- Export a CSV from your bank or card provider and choose the file.
- The columns are matched automatically. Check them and correct anything wrong:
- Header row — which line holds the column names; everything above it is ignored.
- Date column and date format — auto-detect, or force UK, US or ISO ordering.
- Description column.
- Amount layout — one signed column, or separate debit and credit columns.
- Sign convention — whether money out appears as a negative or a positive number.
- Account label and currency — so you can tell several accounts apart later.
- Check the preview table, then Import transactions.
Step 2 — reconcile
Imported transactions are sorted into tabs: Needs review, Unmatched, Matched, Non-business and Deleted. Confident matches are linked for you; anything ambiguous waits under Needs review.
- Auto-match links every transaction whose match is unambiguous, and leaves the rest for you.
- Link to an existing record lets you pick the record type and search by name, reference or notes; leave the search blank to see the closest matches first.
- Ignore marks a transaction as non-business, and Un-ignore puts it back.
- Unmatch breaks an incorrect link.
- Delete is reversible from the Deleted tab. Erase permanently is not — but it does free the transaction so the same statement can be imported again.
Your accountant or bookkeeper
Give an accountant access to your books — view only, or view and edit — and take it back whenever you want.
Dashboard → Setup → Advisors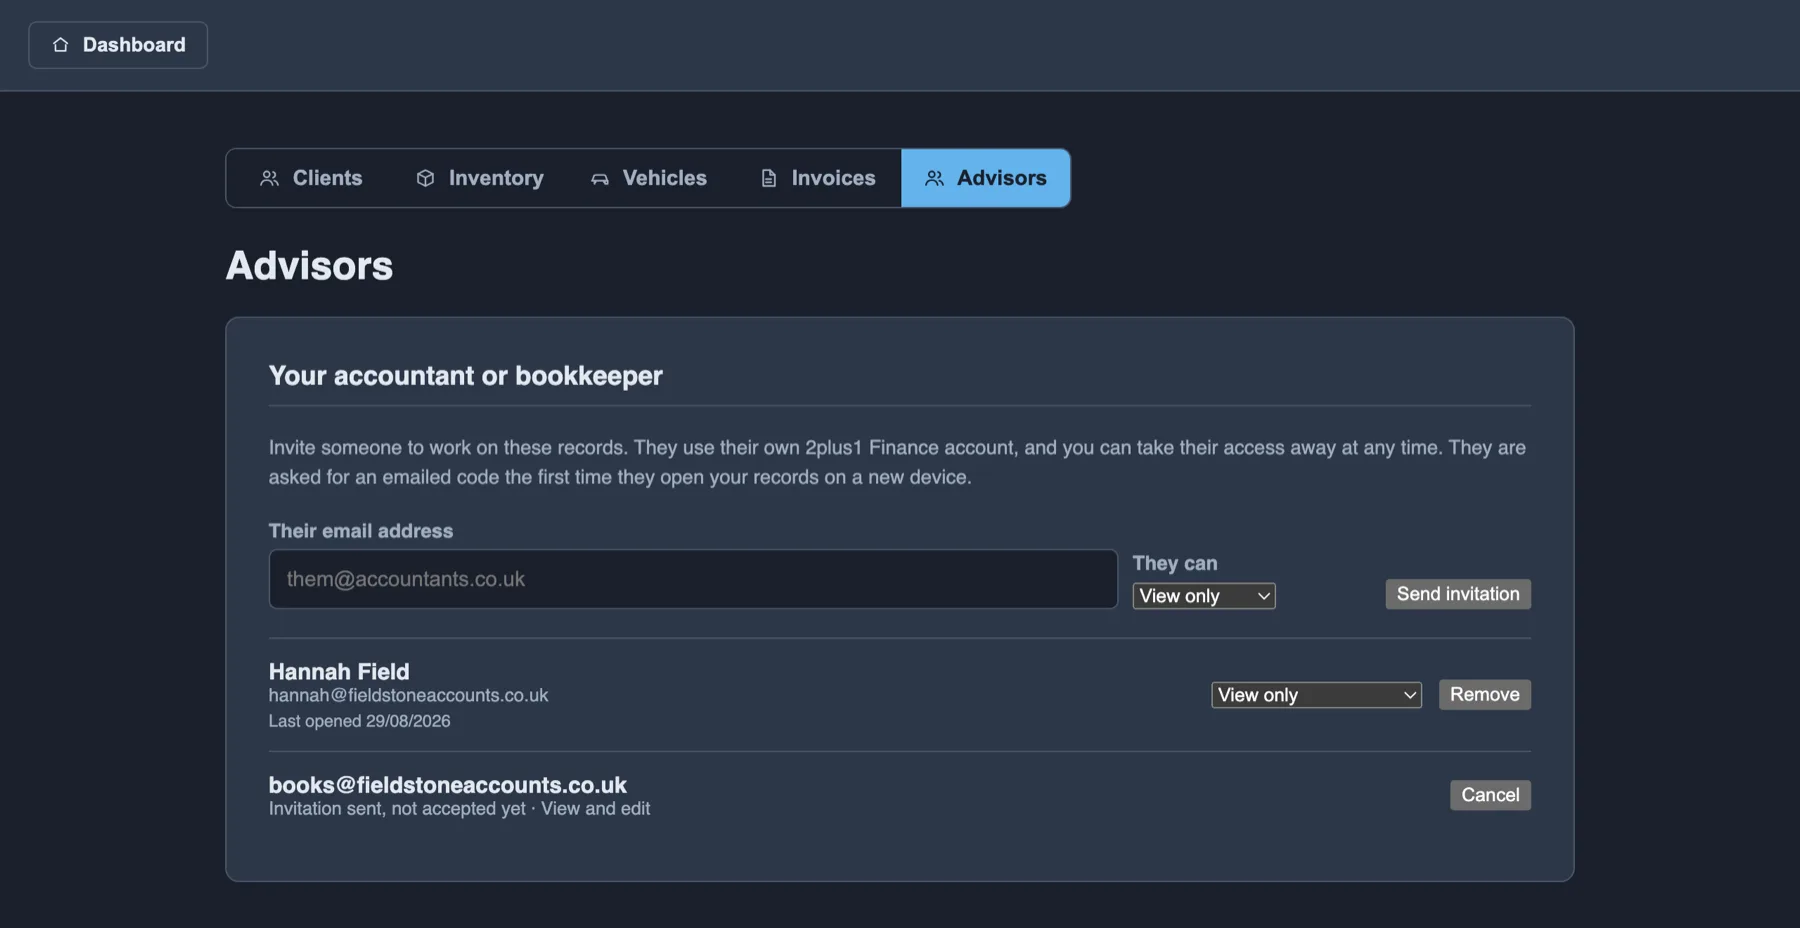
Inviting someone
- Open Setup → Advisors. The tab is only there if you are the owner, working in your own workspace.
- Enter their email address and choose what they can do: View only or View and edit.
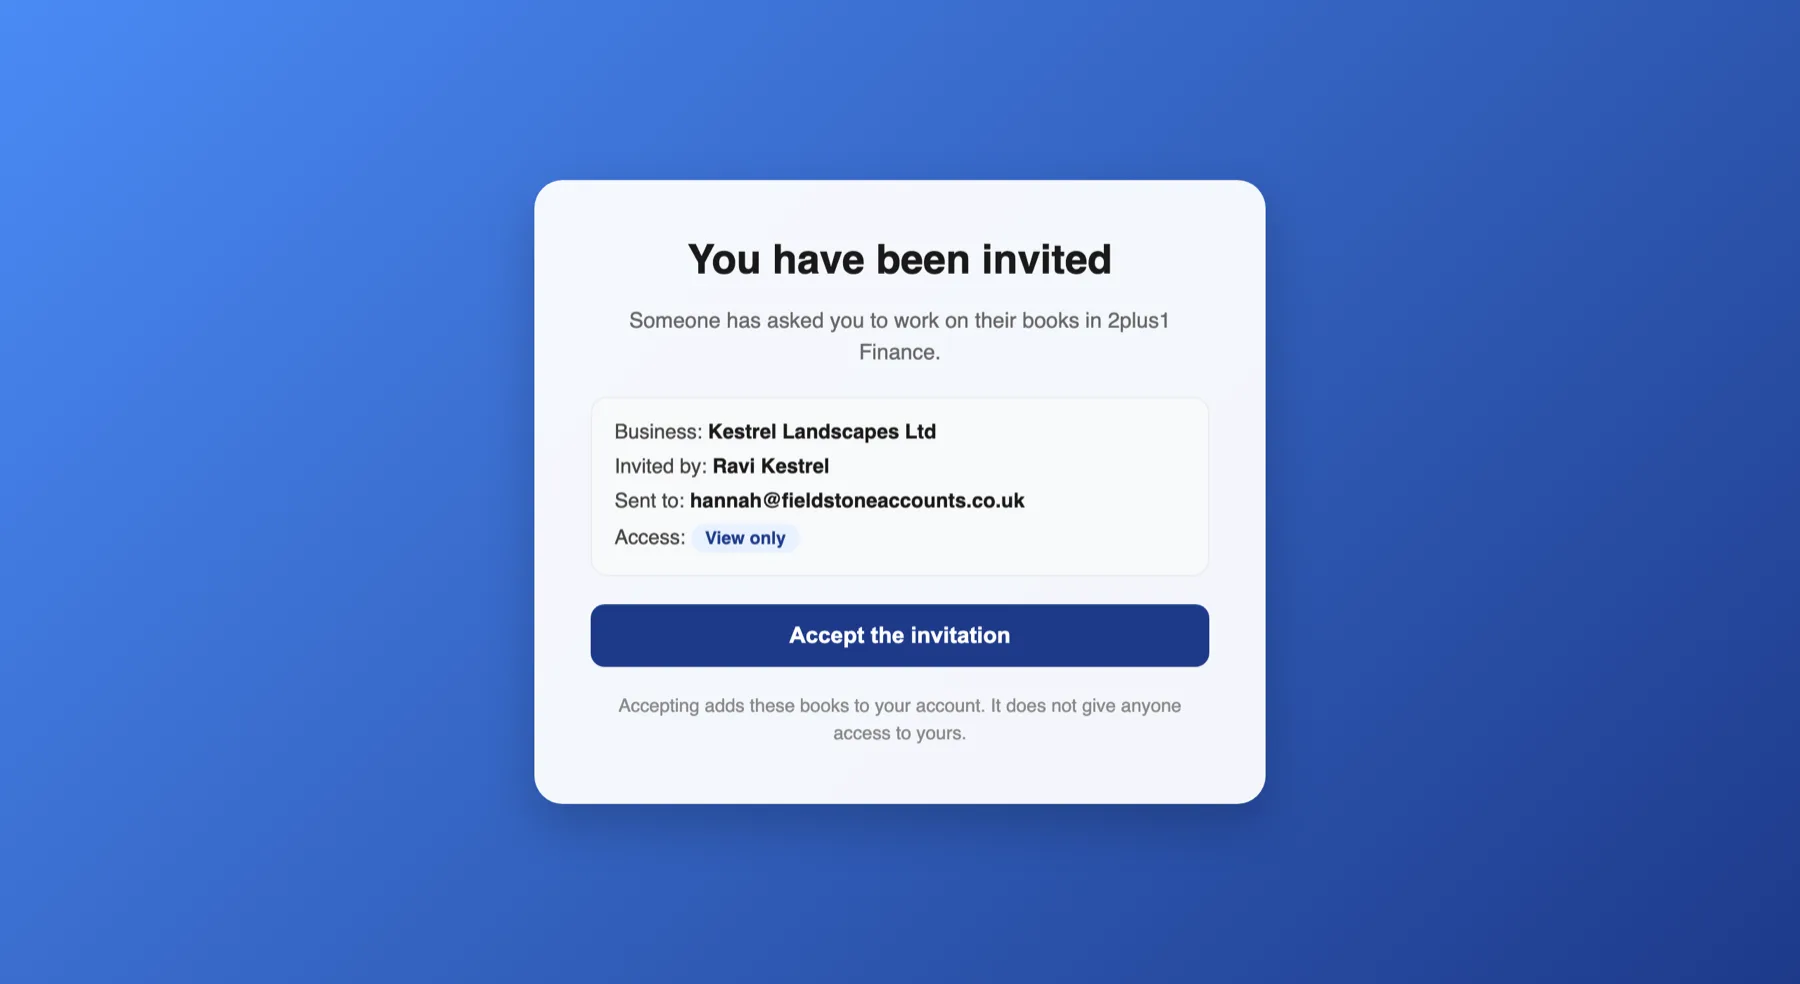
- Send invitation. They get a link showing which business they have been invited to, who invited them and what access they are being offered — before they are asked to sign in or sign up.
- They accept using their own 2plus1finance account. They do not need their own subscription to work on your books; they can create a free account just to accept.
Managing access
- Change someone between View only and View and edit from the dropdown next to their name. It takes effect immediately, including on sessions they already have open.
- Remove ends their access. You are asked to confirm, because any session they have open stops working straight away.
- Cancel withdraws an invitation that was never accepted — the emailed link stops working.
- An invitation only ever works for the address it was sent to. Forwarding it to someone else does not give them access.
If you are the advisor
- Clients' books appear in the business menu under Clients you work on, each marked CAN EDIT or VIEW ONLY, and the header carries a CLIENT marker while you are in them.
- With view-only access every screen still opens; anything that would change a record is refused.
- The client's subscription pays for the client's books. Your own trial or subscription has nothing to do with what you can do inside their workspace — and no trial banner or lockout appears there. You only need your own subscription for your own books.
Account settings
Your details, your subscription, your security, your colleagues and how the app looks.
Dashboard → Settings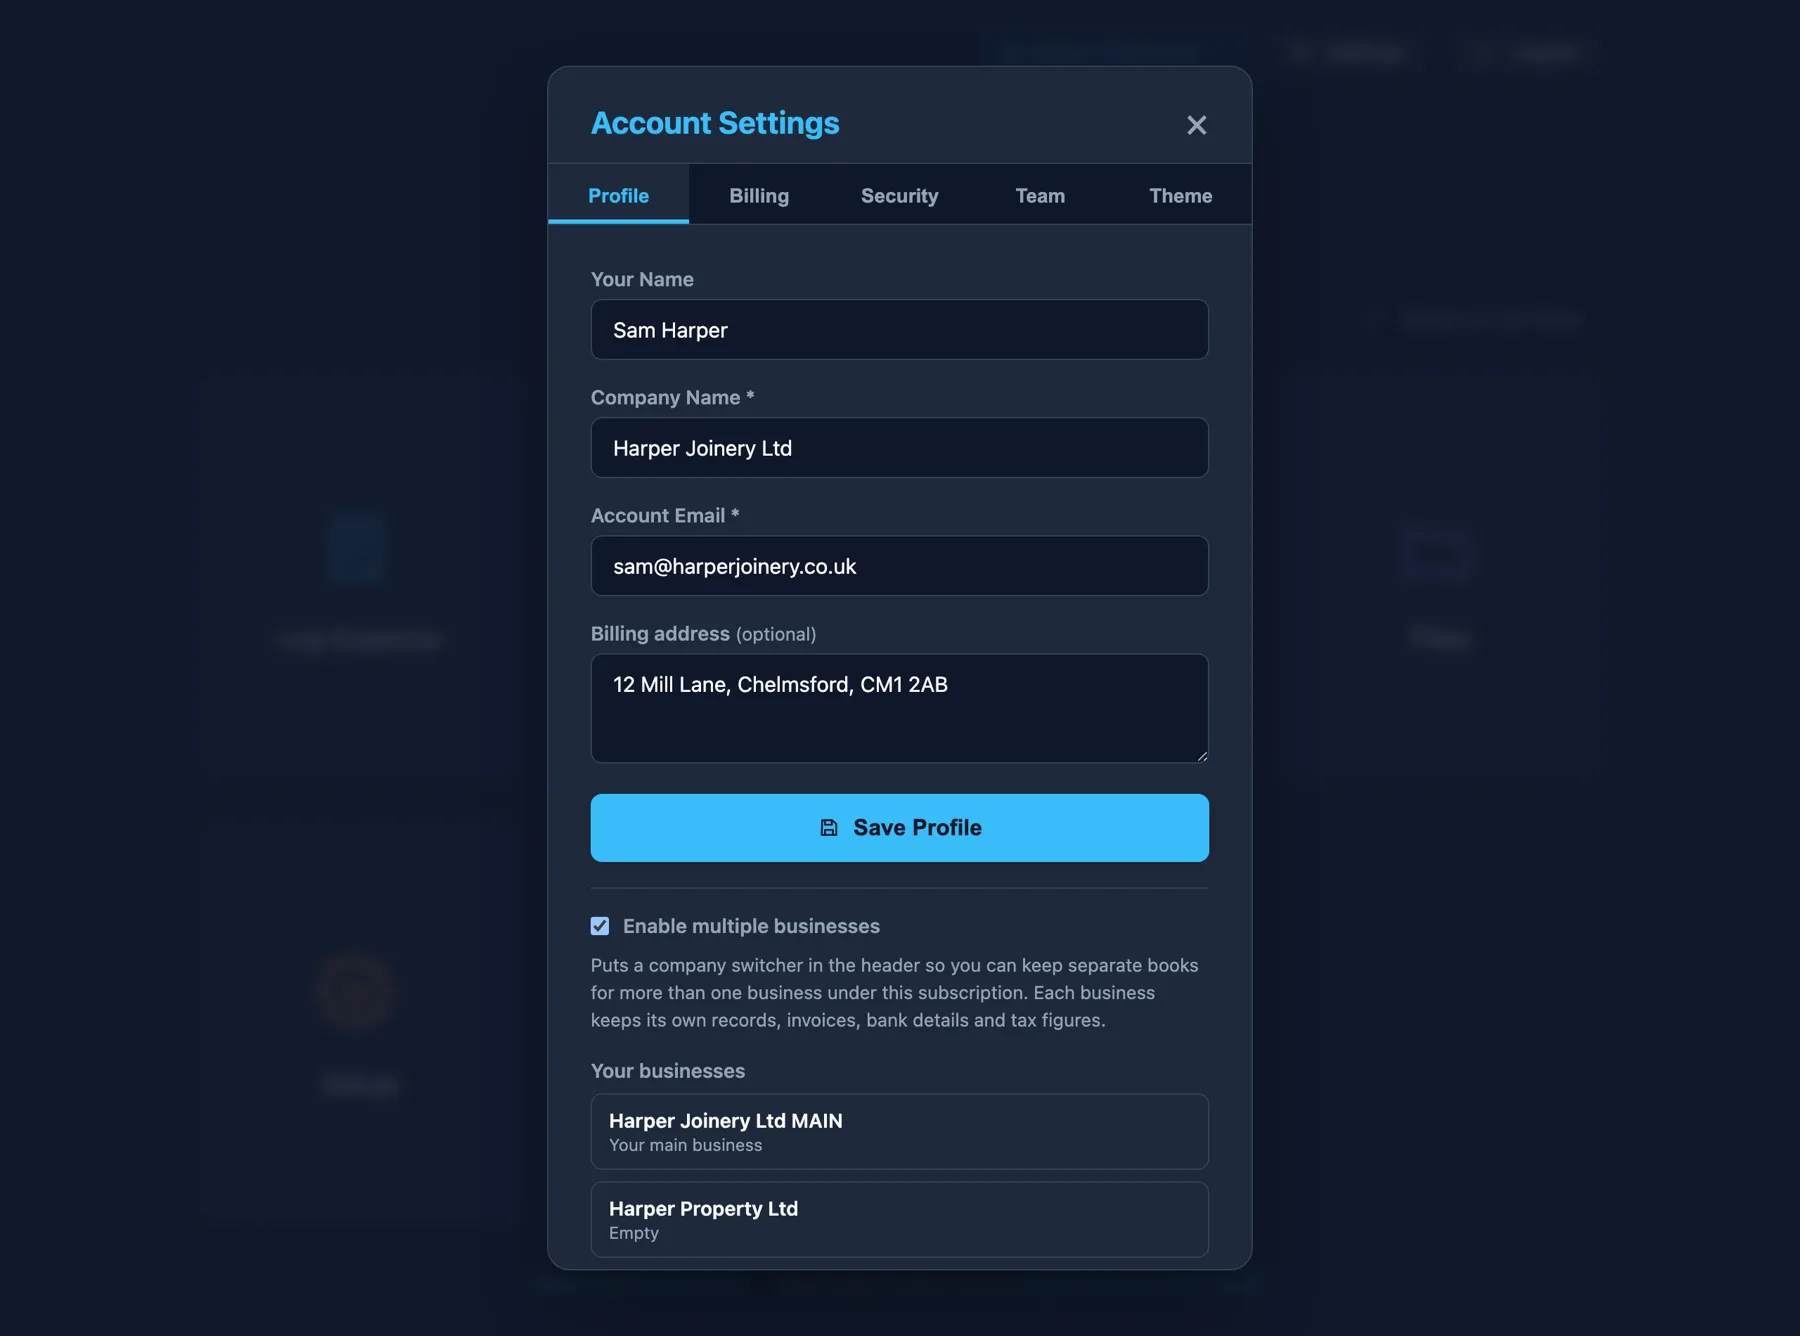
Profile
- Your name, company name (the name shown across the product and on invoices), account email and billing address.
- Changing the account email sends a 5-digit code to the new address; the change only takes effect once you enter it. Until then you keep signing in with the old address.
- Enable multiple businesses puts the business menu in the header so you can keep separate books for more than one business under a single subscription.
- Removing a business hides it and keeps everything inside it; you can restore it from the same list at any time. Only a business that holds nothing at all can be deleted outright.
Billing
- Shows the plan, the status, and the next renewal date. Web subscriptions are collected by Direct Debit.
- Cancel Subscription stops future charges. You and your team keep access until the end of the billing period already paid for.
- Invoices lists your own subscription invoices to download.
- If you subscribed inside the iPhone app, billing is handled by Apple — manage or cancel it in the App Store subscription settings, not here.
Security
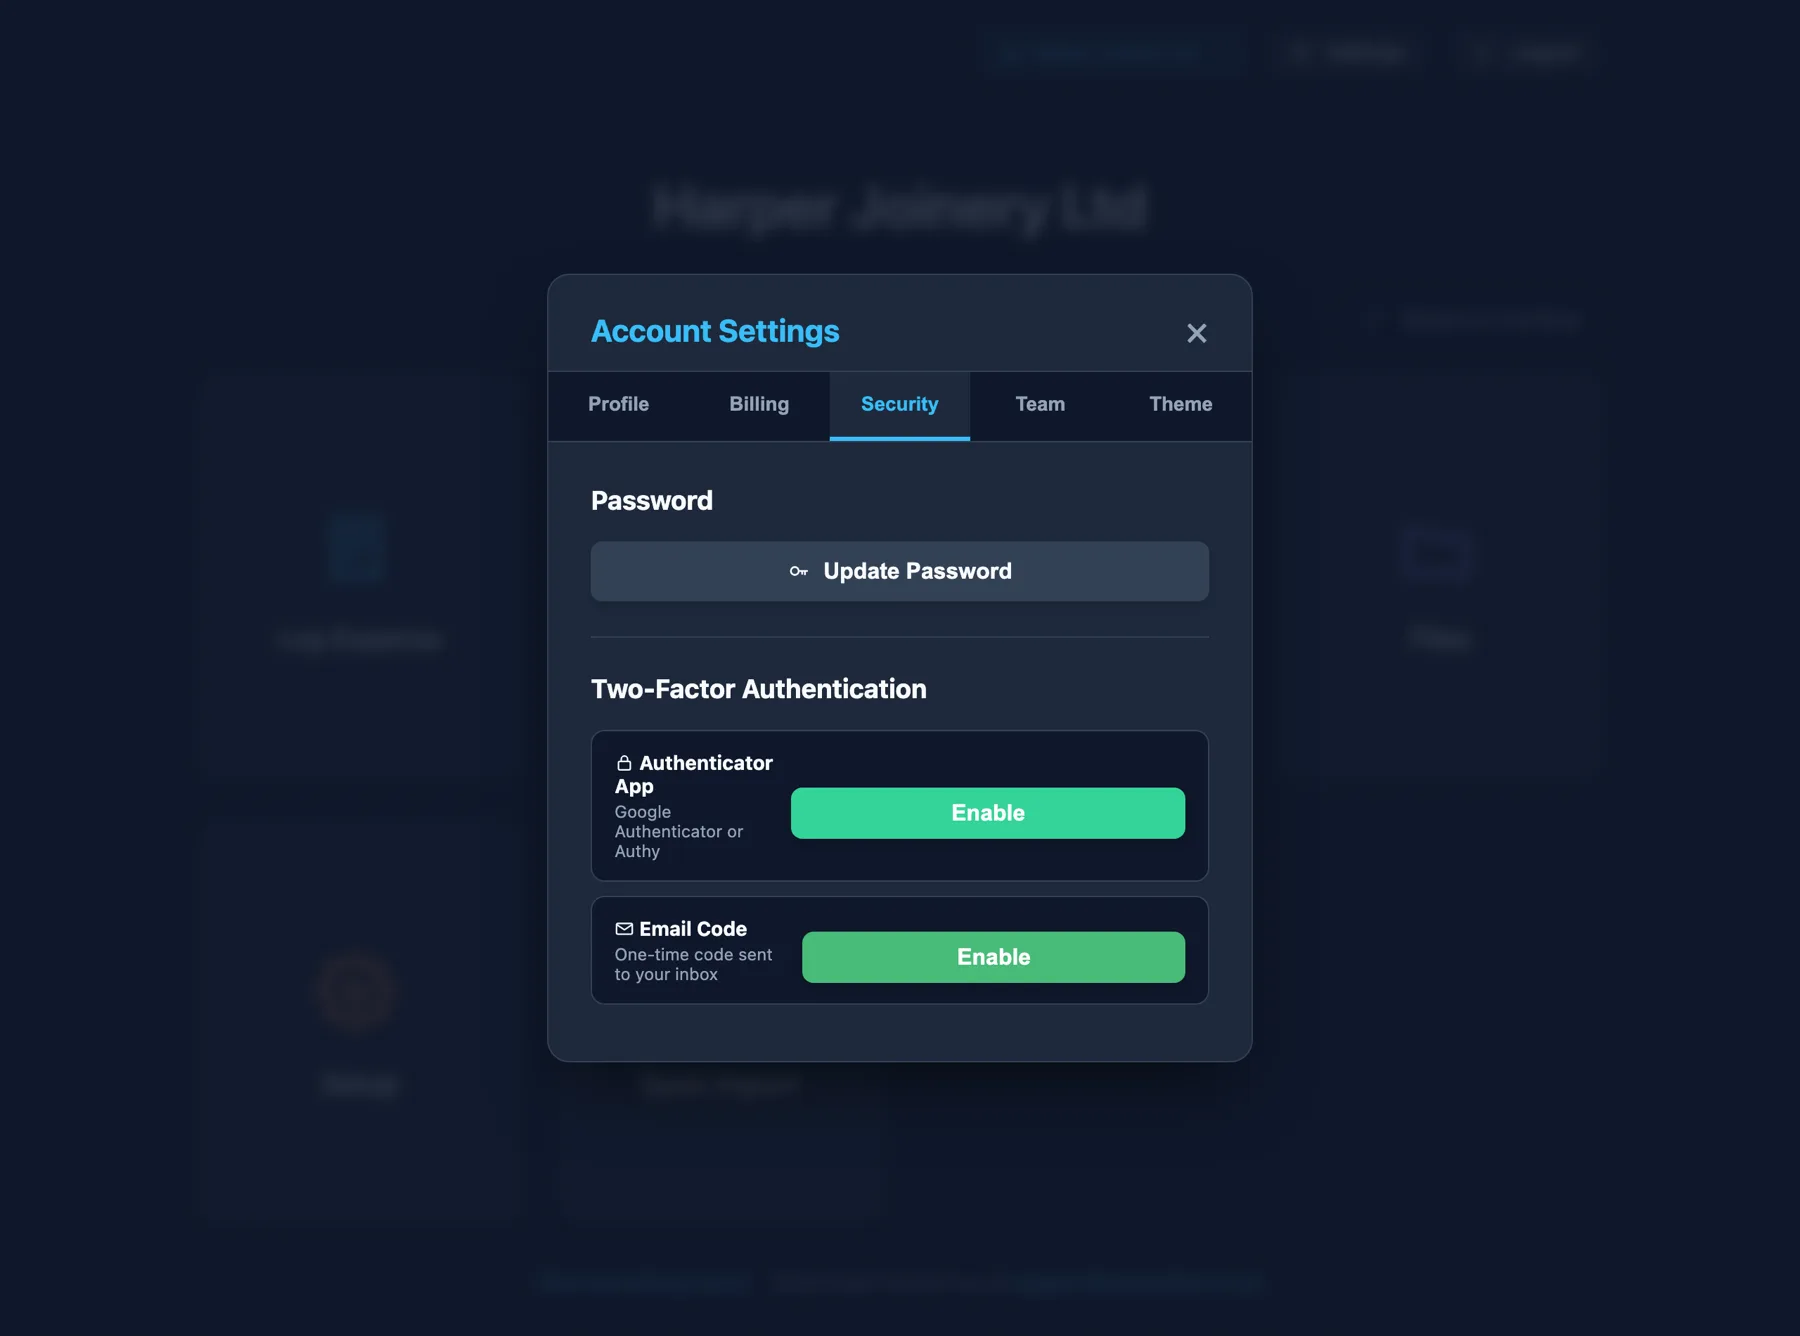
- Update password — current password, then the new one twice, with the strength rules ticking off as you type.
- Authenticator app — scan the QR code with Google Authenticator, Authy or similar (or copy the code in by hand), then enter the 6-digit code to switch it on.
- Email code — a one-time code sent to your inbox at each sign-in, if you would rather not use an app.
- Turning two-factor authentication off asks for your account password first.
Team
Invite a Colleague emails an invitation link. Once accepted, they can log expenses and generate invoices under your company account, and appear in Workspace Members. They do not need their own subscription — they work inside yours. For an accountant who keeps their own separate account, use Advisors instead.
Theme and display
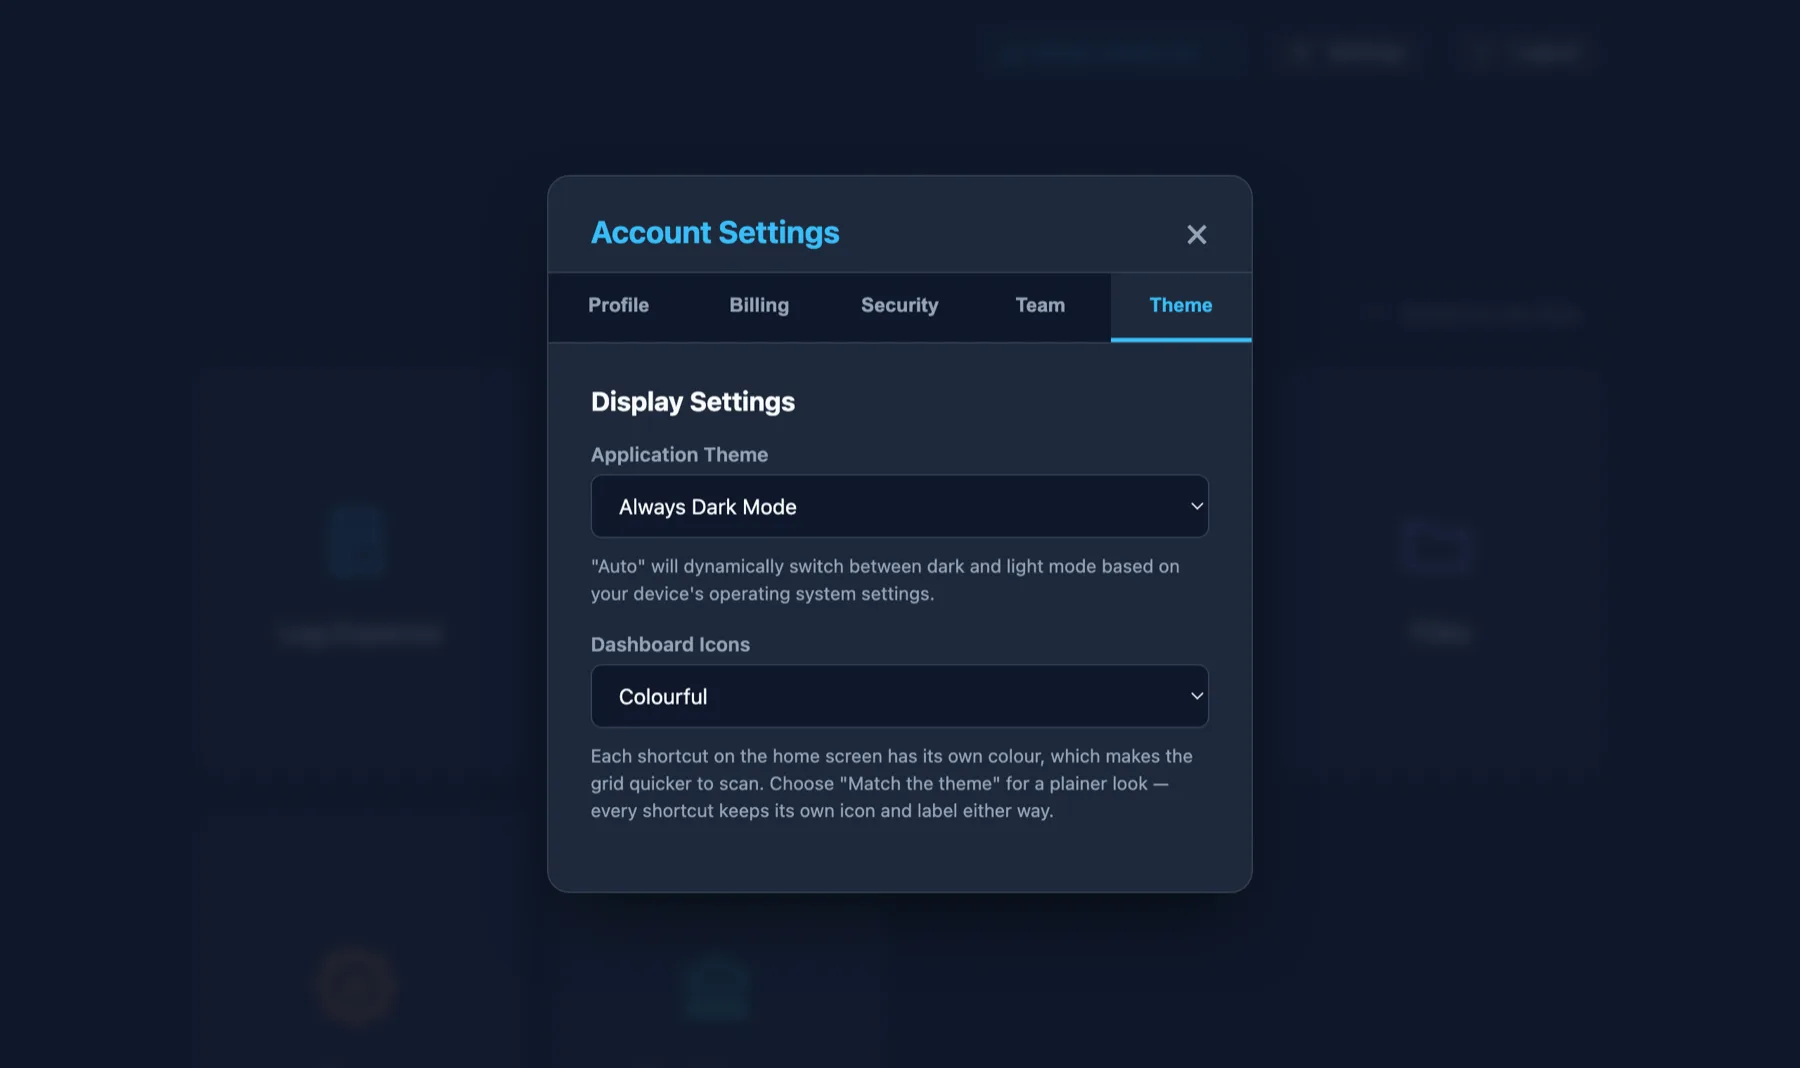
- Application theme — Auto (follows your device), Always Dark, or Always Light.
- Dashboard icons — Colourful gives each shortcut its own colour, which is quicker to scan; Match the theme is plainer. Icons and labels are the same either way.
The phone app
The same workspace on iPhone and Android, with a few things the website does not do.
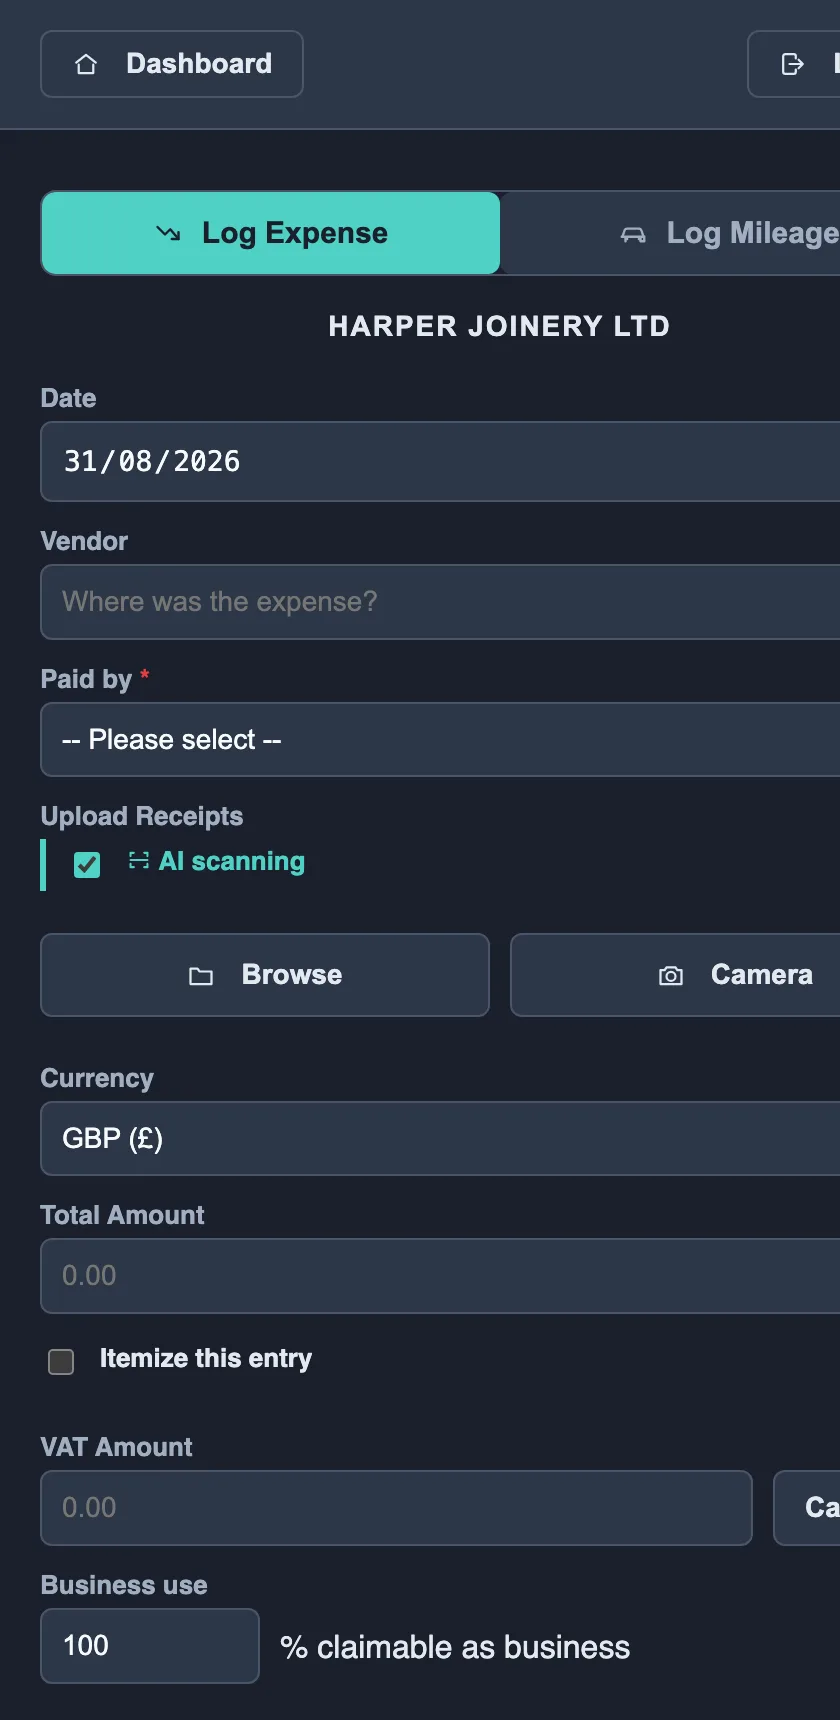
- Camera capture — photograph a receipt straight into an expense rather than uploading a file.
- Face ID / Touch ID — unlock without typing your password once you have enrolled on that device.
- Works offline — records you create with no signal are held on the device and sent up when you are back online. Receipt scanning needs a connection, so an offline receipt is attached to the expense and simply not scanned; the figures are yours to type in.
- Switching business while offline work is pending is refused on purpose. Unsent records belong to the business you created them in, and letting them arrive in a different one would file them against the wrong books.
- Bank Import and the admin tools are website-only.
Common questions
| Question | Answer |
|---|---|
| The verification code has not arrived | Check the spam or junk folder first, then use Resend code. Codes are 5 digits for email verification and password resets, and 6 digits for two-factor sign-in and for opening a client's books. |
| A screen says "Feature Locked" | The trial or subscription has lapsed. Settings → Billing restores access; your records are never deleted for non-payment. |
| The receipt scan is taking a long time | It can take up to about 45 seconds when the service is busy. Keep filling in the form — the scan will not overwrite anything you have typed. |
| The scan got a number wrong | Every field it fills is editable. Correct it before saving, or open the record later in Summary and use Edit. |
| It says my receipt is a duplicate but it isn't | The warning shows the record it matched and its receipt so you can compare. If they really are different purchases, choose Save it anyway. |
| Uploads are failing | You are probably at the storage limit. Empty the Files trash — deleted files still take up space until they are erased. |
| I cannot see Bank Import | It is a preview feature, enabled per workspace and on the website only. |
| I cannot see the Advisors tab | It only appears for the owner, in their own workspace — not to colleagues, and not while you are working in someone else's books. |
| My accountant says they cannot change anything | They were invited as View only. Change it to View and edit in Setup → Advisors; it applies immediately. |
| I deleted something by mistake | Records go to Summary → Trash and files to the Files trash, both restorable. Only Delete Permanently and Empty Trash are final. |
| Can I get my data out? | Yes — Export CSV in Summary for your records, and individual PDFs for invoices and receipts. You can also request a full copy of everything we hold. |
| How do I cancel? | Settings → Billing → Cancel Subscription on the web; in the App Store subscription settings if you subscribed on iOS. Access continues to the end of the period you have paid for. |
Still stuck?
Email [email protected] and we will normally come back to you within 24 hours. Telling us which screen you were on and what you expected to happen gets you an answer fastest.
For a copy of your data, or to have it amended or erased, use the same address — see the support page and the privacy notice.